Tuesday, 22 January 2013

An aside from my Usual Geekery - Use of Statistics by the Media

A quick aside from my usual coding related geekery.  One thing I get a little stressed about is the way the UK media uses numbers and statistics in it's day-to-day output.  Caring about this is part of the DNA of being a geek dad as this stuff is all around us and impacts our perception of the world. 

People make decisions (or don't make decisions) based upon the statistics that are presented to them.  I think it's important that stats are presented clearly, accurately and unambiguously.

Some general examples:
  • Newspapers that use Fahrenheit when talking about hot temperatures ("phwoar it's going to be 100 degrees tomorrow" sounds hotter somehow) but Celsius when talking about cold temperatures (-5 sounds colder than 23).  Just use Celsius!
  • Using relative measures when quoting things like the probability of illness.  e.g. "Scientists have proven that eating <something> increases your chance of getting <some disease> by 100%".  Look at the detail and the absolute rate has changed from 0.05% (1 per 2000) to 0.1% (1 per 1000).  Could be significant, could not; but somehow "100%" sounds a lot worse and could mean supermarkets shelves pile up with unwanted packages of <something>.
Certain newspapers do this a lot, you know the ones I'm talking about...

Last week there was a story about horse DNA and horse meat being found in cheap beef burgers.  Part of the story was that 29% of the meat content of the burgers was found to be horse meat.  This is quite a vague statement in itself and could be interpreted by some as 29% of the burger itself was horse meat.  My interpretation is that the burger itself is only partially made up of meat with the rest being fillers and other stuff I really don't want to know about.  So, say 10% of the burger is meat, this means only 2.9% of the burger is horse meat.  Still not great (especially if you don't want to eat horse) but the missing statistic (% of burger that is meat) renders the quoted statistic (29% of the meat content is horse) meaningless.

I was driving for about 90 minutes when the story broke so heard about it over and over again on BBC 5 live.  What annoyed me even more was some of the reporters saying "29% of the burger was horse".  Grrrr.

My goat was got last Friday morning when watching BBC Newsround (kids focussed news TV programme for all you non-UK residents).  The presenter (who was all of 20) was out and about in Wales describing the snow that was falling and said how "2 inches of snow have fallen already".  I'm 38 but I was taught in metres, kg and litres; my kids won't have a clue what an inch is.  I've NEVER done this sort of thing before but I was prompted to write this email to BBC Newsround:

Hi,
I just wanted to write regarding the section on the weather from your show at 7.40 this morning.  

Before I go in to this I want to stress that a)I'm not one for complaining about TV shows (this is the 1st time I've ever done it) and b)I think Newsround is ace and so does my 8 and 5 year old girls.

During the show, your presenter was out in the snow in Wales and talked about how "two inches of snow" was already laying on the ground. It may sound finicky but I don't think a programme that is designed to educate and inform our children should be using old fashioned, antiquated terms like an inch.  

I know we're a bit schizophrenic with our measurement units in this country but I'm getting on for 40 and I was taught to use kg, cm, litres and centigrade.  I know what an inch is but my children have absolutely no clue.

So this is not specifically about the use of the word inch but more about a tendency in some parts of the media to use nostalgic terms and themes to get their message across.  We should be setting our children up for success and this means using the right units and focussing on the future; learning from the past but not being constrained by it.  Hence I don't think Newsround should pay any part in this nostalgic practise.

I'm not desiring an apology or anything like that but it would be good to know whether you have editorial guidelines to cover this sort of thing and it was just a "slip" this morning.

Regards

Paul Weeks
Age 38
Grew up with John Craven and still love Newsround

So to again, to stress, it's not specifically the use of the word inch, it's how this type of obsession with antiquated measures, messy use of stats and the past could hold back the next generation.  Why is it that the inch is somehow the standard unit of measurement for snow depth???  The media does influence our children so it's incumbent on them to get this stuff right.  

Here's the response I received


Hello Paul

Thanks for writing to us.

It was a slip! We tend to use the unit that makes most sense to children. So in that case, we should have used CM, whereas, if we were talking about someone’s height, we’d probably have used feet and inches, since that’s still what most people – even children - understand. I think it’s important for us to reflect natural usage, rather than lead the way in conversion.

Best

XXXXXXX
Deputy Editor


(I've withheld the name above deliberately).

Fair enough, they said they got it wrong.  However I think that (whether they know it or not) do have a responsibility to lead the way in this kind of thing.

</rant>

Tuesday, 8 January 2013

SL4A and Bing Human Language Conversation

Just before Christmas, my English colleague told me how he likes to conduct instant messaging sessions with my Italian colleague in Italian.  My English colleague doesn't speak Italian, he just uses the babelfish site to do the conversation.

So that's fine for written translation but what about spoken translation?  There are apps available to do this but I thought it would be fun to write my own, (and you learn more by doing rather than simply using).  To do this I used my all time favourite scripting capability for Android, Python using SL4A

The plan was to have something that would:
  1. Listen to my voice and translate it to (English) text.  i.e. Speech-to-text
  2. Translate the English in to another language.
  3. Do text-to-speech the resulting language.
For speech-to-text, this is very easy in  SL4A.  Here's a code fragment:

import android

#Set up out droid object
droid = android.Android()


#Get the speech
speech = droid.recognizeSpeech("Talk Now",None,None)
print "You said: " + speech[1]


This just pops up a dialogue that prompts you to speak, when it detects a pause it goes away (presumably to Google's servers) and does the text-to-speech translation.  It then prints the result to screen.  It's pretty accurate and can even handle whole sentences.

Text-to-speech is pretty easy as well.  Assuming you've imported Android and created an Android object (as above), it's simply:

droid.ttsSpeak(TextToSpeak)

So easy! 

To get the text-to-speech part to work I did need to change some settings on my Android device.  Specifically, on my HTC Desire HD I needed to go menu - Settings - Voice input & output settings- Text-to-speech settings and:

1)Install voice data (a quick download from the Play Store), and

2)Set the language - French(France) for my tinkering.

Both of these things used to be a premium product and those chaps from Google give it away for free!

The trickier part was doing the translation from English to French.  However as I've learnt through  my tinkering, there's an API for pretty much everything these days...  A quick Google search led me to the Bing translation API.  This provides a HTTP REST, AJAX and SOAP interfaces to perform a range of tasks.

Using it is relatively simple.  You:

1)Register a developer account, register a translation application and get a client ID and client secret.

2)Make a HTTP GET call to get a temporary access token, (last 10 minutes).

3)Make a HTTP GET call to translate your chosen text.

As luck would have it, this excellent blog details the process you go through to set up and use the API and has Python code available for you to re-use.  All credit to the Blog author, Denis Papathanasiou.

Here's a screenshot.  You can see how it's detected what I've spoken and translated it in to French.  Of course you can't hear the spoken response but trust me, it works a treat.  The nasty error message at the end just comes from the inelegant way I ended the script in order to remove the "Speak Now" dialogue that obscured the text:


Full code listing is below.  To get it to work for you simply edit the clientID and client secret values to match yours.  To change languages simply edit the line TheResponse = translate(token, speech[1], 'fr', 'en') and also change the settings within the handset settings menu.  Inelegant I know but hey, this is tinkering!


# SL4A Demos Transcribe Speech
# http://blog.matthewashrafi.com/
http://denis.papathanasiou.org/?p=948

#Language translation and suchlike

#Secret keys.  Enter your own here.
MY_CLIENT_ID = ""
MY_CLIENT_SECRET = ""

#!/usr/bin/python

"""

msmt.py


Functions to access the Microsoft Translator API HTTP Interface, using python's urllib/urllib2 libraries


"""


import urllib, urllib2
import json
import android


from datetime import datetime


def datestring (display_format="%a, %d %b %Y %H:%M:%S", datetime_object=None):

    """Convert the datetime.date object (defaults to now, in utc) into a string, in the given display format"""

    if datetime_object is None:

        datetime_object = datetime.utcnow()

    return datetime.strftime(datetime_object, display_format)


def get_access_token (client_id, client_secret):

    """Make an HTTP POST request to the token service, and return the access_token,

    as described in number 3, here: http://msdn.microsoft.com/en-us/library/hh454949.aspx

    """


    data = urllib.urlencode({

            'client_id' : client_id,

            'client_secret' : client_secret,

            'grant_type' : 'client_credentials',

            'scope' : 'http://api.microsofttranslator.com'

            })


    try:


        request = urllib2.Request('https://datamarket.accesscontrol.windows.net/v2/OAuth2-13')

        request.add_data(data) 


        response = urllib2.urlopen(request)

        response_data = json.loads(response.read())


        if response_data.has_key('access_token'):

            return response_data['access_token']


    except urllib2.URLError, e:

        if hasattr(e, 'reason'):

            print datestring(), 'Could not connect to the server:', e.reason

        elif hasattr(e, 'code'):

            print datestring(), 'Server error: ', e.code

    except TypeError:

        print datestring(), 'Bad data from server'


supported_languages = { # as defined here: http://msdn.microsoft.com/en-us/library/hh456380.aspx

    'ar' : ' Arabic',

    'bg' : 'Bulgarian',

    'ca' : 'Catalan',

    'zh-CHS' : 'Chinese (Simplified)',

    'zh-CHT' : 'Chinese (Traditional)',

    'cs' : 'Czech',

    'da' : 'Danish',

    'nl' : 'Dutch',

    'en' : 'English',

    'et' : 'Estonian',

    'fi' : 'Finnish',

    'fr' : 'French',

    'de' : 'German',

    'el' : 'Greek',

    'ht' : 'Haitian Creole',

    'he' : 'Hebrew',

    'hi' : 'Hindi',

    'hu' : 'Hungarian',

    'id' : 'Indonesian',

    'it' : 'Italian',

    'ja' : 'Japanese',

    'ko' : 'Korean',

    'lv' : 'Latvian',

    'lt' : 'Lithuanian',

    'mww' : 'Hmong Daw',

    'no' : 'Norwegian',

    'pl' : 'Polish',

    'pt' : 'Portuguese',

    'ro' : 'Romanian',

    'ru' : 'Russian',

    'sk' : 'Slovak',

    'sl' : 'Slovenian',

    'es' : 'Spanish',

    'sv' : 'Swedish',

    'th' : 'Thai',

    'tr' : 'Turkish',

    'uk' : 'Ukrainian',

    'vi' : 'Vietnamese',

}


def print_supported_languages ():

    """Display the list of supported language codes and the descriptions as a single string

    (used when a call to translate requests an unsupported code)"""


    codes = []

    for k,v in supported_languages.items():

        codes.append('\t'.join([k, '=', v]))

    return '\n'.join(codes)


def to_bytestring (s):

    """Convert the given unicode string to a bytestring, using utf-8 encoding,

    unless it's already a bytestring"""


    if s:

        if isinstance(s, str):

            return s

        else:

            return s.encode('utf-8')


def translate (access_token, text, to_lang, from_lang=None):

    """Use the HTTP Interface to translate text, as described here:

    http://msdn.microsoft.com/en-us/library/ff512387.aspx

    and return an xml string if successful

    """


    if not access_token:

        print 'Sorry, the access token is invalid'

    else:

        if to_lang not in supported_languages.keys():

            print 'Sorry, the API cannot translate to', to_lang

            print 'Please use one of these instead:'

            print print_supported_languages()

        else:

            data = { 'text' : to_bytestring(text), 'to' : to_lang }


            if from_lang:

                if from_lang not in supported_languages.keys():

                    print 'Sorry, the API cannot translate from', from_lang

                    print 'Please use one of these instead:'

                    print print_supported_languages()

                    return

                else:

                    data['from'] = from_lang


            try:


                request = urllib2.Request('http://api.microsofttranslator.com/v2/Http.svc/Translate?'+urllib.urlencode(data))

                request.add_header('Authorization', 'Bearer '+access_token)


                response = urllib2.urlopen(request)

                return response.read()


            except urllib2.URLError, e:

                if hasattr(e, 'reason'):

                    print datestring(), 'Could not connect to the server:', e.reason

                elif hasattr(e, 'code'):

                    print datestring(), 'Server error: ', e.code

#Gets the text from the XML response from MSFT 
def GetTextFromXML (InXML):
  #Here be an example
  #The response was: <string xmlns="http://schemas.microsoft.com/2003/10/Serialization/">grue</string>
  #The '>' and subsequent '<' can be used to denote the string
  
  #Get the position of the first '>'
  BracketPos = InXML.find('>')

  #Now get everything from that point
  MyStr = InXML[BracketPos+1:len(InXML)-1]
  #print "String so far " + MyStr

  #Now get the second '<'
  BracketPos = MyStr.find('<')

  #And get everything before that
  MyStr = MyStr[0:BracketPos]

  return MyStr


###The main body of code


#Set up out droid object
droid = android.Android()

#Get the token to use for the loop
token = get_access_token(MY_CLIENT_ID, MY_CLIENT_SECRET)
#print "Token: " + token

#Print some funky stuff
print "###################################################"
print "# SL4A Demos Transcribe Speech                    #"
print "# From http://blog.matthewashrafi.com/            #"
print "# Also from http://denis.papathanasiou.org/?p=948 #" 
print "###################################################"

while True:
  
  #Get the speech
  speech = droid.recognizeSpeech("Talk Now",None,None)
  print "You said: " + speech[1]
  
  #Call a def to get a response 
  TheResponse = translate(token, speech[1], 'fr', 'en')
  print "The response was: " + TheResponse

  #Now extract from the XML...
  ExtractedResponse = GetTextFromXML(TheResponse)
  print "Extracted Response: " + ExtractedResponse

  #Do the text to speech bit
  droid.ttsSpeak(ExtractedResponse)


Sunday, 30 December 2012

More on the LightwaveRF UDP Interface and COSM

Previously I've blogged on the LightwaveRF UDP interface and logging measurements to COSM.  I've tinkered with the scripts to make them more reliable so I thought I would share a full code listing with some notes as to how to do it yourself.

Before I get into the code, here's a chart from COSM showing recent electricity costs for my home:


This shows how Christmas Eve has been the most expensive day this week, (actually the second most expensive since I started logging).  This was down to us doing stacks of cooking that day in preparation for the Christmas festivities.

The method consists of two Python scripts running on an Android handset.  One to send the command to the LightwaveRF “WiFi Link”, one to receive the response and post it to COSM.

The code listing for the sender script is shown below, (I'll then go on to describe the longer receiver script).  The only thing you'll need to change is the constant "UDP_IP" to represent the IP address that your WiFi Link is on.  I have a feature on my ADSL router to always assign this address to the WiFi link.

The script then stays in and endless loop, sending the command, pausing 60 seconds then starting again.  Change time.sleep(60) if you want it to send more / less frequently.

When you run this script, you’ll have to press a button on the WiFi Link to authorise the handset to send commands to it.  After this you’ll never have to do this again.  The try: and except: constructs allow for error capture and handling.  Until I put these in the script was quite unreliable but with them the script has been running non-stop for 2 months.

import socket
import time

UDP_IP = '192.168.0.2'
UDP_PORT = 9760
INET_ADDR = (UDP_IP,UDP_PORT)

MESSAGE = "123,@?\0"

print "UDP target IP:", UDP_IP 
print "UDP target port:", UDP_PORT 
print "message:", MESSAGE

sock = socket.socket(socket.AF_INET, socket.SOCK_DGRAM)

#sock.sendto(MESSAGE, (UDP_IP, UDP_PORT))

while True:
  try:
    sock.sendto(MESSAGE, INET_ADDR)
    print "done sending udp"
    time.sleep(60)
  except Exception, err:
    #Write a log with the error 
print "Got us an exception: " + str(err)   


The receiving script is a lot longer and is shown below.You'll have to set up your COSM account
accordingly and edit a number of number of things to get it working.

Here are the things to edit and set up:

1)The IP address assigned to the Android handset, (UDP_IP).  Again I use my ADSL router feature to make sure this IP address is always assigned.

2)Change the COSM parameters:
  • TimeZoneOffset - This is used to manage timezones and daylight saving time.  I had this as "+01:00" during UK daylight saving time and changed this to "+00:00" when we moved back to Greenwich Mean Time.  Change this to reflect the timezone you're in, (COSM uses UTC).
  • MyFeedID - This is the feed ID created in COSM
  • MyWattsNowAPIKey - The API key set up for this feed and the associated datastreams. Make sure you have full priviledges for the key.
  • The six datastream names.  Four are for the distinct LightwaveRF measurements.  The cost ones are derived from the Wh values and my personal energy costs.
3)The UnitCost and DailyCost parameters represent my electricity costs which are calculate as DailyCost + (UnitCost * KWh) in the CalculateCosts sub-routine.

4)Naughty, naughty - I've embedded what could be a constant quite low down in the code with this line "chdir('/mnt/sdcard/webserver/energy_measurements')".   Change the directory to one you've got set up on your handset, (or delete / comment the line out and the script will write to the /scripts directory).  In this directory I write two log files:

  • energy_measurements.csv - This is a local copy of all the measurements I take.
  • energy_measurements_log_file.txt - At various points in the code I call a sub-routine called WriteDebugLog which simply write a line of text to a file associated with key points of code execution.  I used this when I set the script up to give me information as to where the code was getting "stuck".

The main body of code then just stays in a continuous loop, waits for a UDP segment to be received, parses it and writes the measurements to COSM.

To run the code simply create 2 .py files with each of the scripts listed, copy them to the /sl4a/scripts directory on the handset and run them.  If it works like mine it will be very reliable!

#v1=Just Watts measurement. V2=Added other4 values. V3=Added GBP values. V4=Added errorlogging

#Import statements
import socket
import datetime
from os import chdir 
import httplib
import sys

#Some constants for this, the server (192.168.0.3)
UDP_IP = "192.168.0.3"
UDP_PORT = 9761            #Responses always sent to this port

#These are constants related to the COSM feed
TimeZoneOffset = "+00:00"
MyFeedID = ""
MyWattsNowAPIKey = ""
MyWattsNowDataStream = "WattsNow"
MyMaxWattsDataStream = "WattsNow_Max"
MyCumulativeWattsDataStream = "WattsNow_Cumulative"
MyYesterdayTotalDataStream = "WattsNow_TotalYesterday"
MyCumulativeCostDataStream = "WattsNow_CostToday"
MyCostYesterdayDataStream = "WattsNow_CostYesterday"

#Constants related to costs
UnitCost =13.42
DailyCost = 16.45

#This is a Python function that writes a log file.  Used for debugging purposes
def WriteDebugLog(StrToLog):
  #Form a date and time for this
  #Get the date and time
  DateToday = datetime.date.today()
  TimeNow = datetime.datetime.now()
    
  #Form the string we will write to screen and local file
  LogFileString = str(DateToday) + "," + str(TimeNow) + "," + StrToLog  


  #And log to file.  "a" means append if necessary
  logfile = open("energy_measurements_log_file.txt", "a")
  logfile.write(LogFileString + "\n")
  logfile.close()  

  return

#This is a Python function to log to COSM
def SendToCOSM(ValToSend,KeyToUse,FeedToUse,DataStreamToUse):
  #Use this try statement to capture errors  
  try:
    #Write to our debug log file
    WriteDebugLog("Start of write to COSM Function. " + DataStreamToUse)  

    #First form the string to send.  Here be an example '2012-09-30T22:00:00.676045+01:00,66'
    #So we need some date geekery for this  
    #Get a variable to hold the date
    today = datetime.datetime.now()

    #Create an overall string with the story so far
    MyDateTimeString = today.strftime("%Y-%m-%d") + "T"

    #Now for the time bit - First the format string
    FormattedTime = today.strftime("%H:%M:%S")    #Get the formatted time

    #Now form the full monty string
    MyDateTimeString = MyDateTimeString + FormattedTime + TimeZoneOffset + "," + ValToSend
  
    #And get it's length
    MyStrLen = str(len(MyDateTimeString))

    #Print what we got so far
    print 'FullString:', MyDateTimeString
  
    #Now do the HTTP magic - Connect to the server
    h = httplib.HTTP('api.cosm.com')
  
    # build url we want to request
    FullURL = 'http://api.cosm.com/v2/feeds/'+ FeedToUse + '/datastreams/' + DataStreamToUse + '/datapoints.csv'

    #Print the URI string we will use
    print "Full URL: " + FullURL
  
    # POST our data.  
    h.putrequest('POST',FullURL)    
 
    # setup the user agent
    h.putheader('X-ApiKey',KeyToUse)
    h.putheader('Content-Length',MyStrLen)   

    # we're done with the headers....
    h.endheaders()
  
    #Send the data
    h.send(MyDateTimeString)

    #Get the response from the request
    returncode, returnmsg,headers = h.getreply()
   
    #display whatever the results are....
    f = h.getfile()
    MyData = f.read()
    print f.read()
  
    #Write to our debug log file
    WriteDebugLog("End of write to COSM Function")
    
    #Now just return
    return 
  #Catch an exception
  except Exception, err:
    #Write a log with the error
    print "Got us an exception: " + str(err)
    #WriteDebugLog("Caught this error in log to COSM function: " + str(err)     
           
#This function calculates the cost in pounds for the electricity used.
#The formula is ((WattHours/ 1000) * (UnitCost / 100)) + (DailyCharge / 100)
def CalculateCosts(InWattHours):
  #WattHours comes in as a string so need to turn to a number
  
  #do the calculation
  CostInPoundsFloat = ((float(InWattHours) / 1000) * (UnitCost / 100)) + (DailyCost / 100)

  #Round it to 2 decimal places
  CostInPoundsFloat = round(CostInPoundsFloat,2)
  
  #return a string
  return str(CostInPoundsFloat)

########################################
#Now we start the main part of the code
########################################


#Change directory that we will write to
chdir('/mnt/sdcard/webserver/energy_measurements') 

#Tell the user we've started
print "UDP server started.  Waiting for response...."

#Bind a socket 
sock = socket.socket(socket.AF_INET, socket.SOCK_DGRAM) # UDP
sock.bind((UDP_IP, UDP_PORT))

#Now just loop until you receive a response
while True:
    #Read data from the buffer
    data, addr = sock.recvfrom(1024) #buffer size is 1024               
    
    #Write to our debug log file
    WriteDebugLog("What we read from the buffer: " + data)
    
    #Get rid of the initial part of the result string as this
    #Is just a static command portion.  First get the length
    DataLength = len(data) - 1
    #Now extract everything from character 7 to the end           
    MeasurementCSV = data[7:DataLength]

    #Write to our debug log file
    WriteDebugLog("Just the measurements after removing the command prefix: " + MeasurementCSV)

    #Get the date and time
    today = datetime.date.today()
    TheTime = datetime.datetime.now()
    
    #Form the string we will write to screen and local file
    OutString = str(today) + "," + str(TheTime) + "," + MeasurementCSV
    
    #Print the result...
    print OutString
    
    #Write to our debug log file
    WriteDebugLog("The string that we will log to the log file: " + OutString)
     
    #And log to file.  "a" means append if necessary
    logfile = open("energy_measurements.csv", "a")
    logfile.write(OutString)
    logfile.close()
     
    #Write to our debug log file
    WriteDebugLog("Have just written the log file CSV") 

    #Split the string and assign to variables  
    SplitMeasurement = MeasurementCSV.split(',')    
    WattsNow = SplitMeasurement[0]            #The power value for now (Watts)
    MaxWatts = SplitMeasurement[1]            #The max power today (Watts)
    CumToday = SplitMeasurement[2]            #Cumulative today (Watt Hours)
    TotalYesterday = SplitMeasurement[3]      #Total yesterday (Watt Hours)

    #Write to our debug log file
    WriteDebugLog("Have just split the string in 4") 

    #Print the output 
    print "Watts Now [W]:" + WattsNow
    print "Max Watts Today [W]:" + MaxWatts
    print "Cumulative Today [Wh]:" + CumToday
    print "Total Yesterday [Wh]:" + TotalYesterday    

    #Write to our debug log file
    WriteDebugLog("Have just printed the measurements to screen") 

    #Log to COSM dude!!! First check it's not 0 as that looks rubbish!
    if WattsNow == "0":
      print "Not sending as it's 0 Watts"
      
      #Write to our debug log file
      WriteDebugLog("Saw that the Watts measurement was 0 so didn't log to COSM") 
    else:
      SendToCOSM(WattsNow,MyWattsNowAPIKey,MyFeedID,MyWattsNowDataStream)
      SendToCOSM(MaxWatts,MyWattsNowAPIKey,MyFeedID,MyMaxWattsDataStream)
      SendToCOSM(CumToday,MyWattsNowAPIKey,MyFeedID,MyCumulativeWattsDataStream)
      SendToCOSM(TotalYesterday,MyWattsNowAPIKey,MyFeedID,MyYesterdayTotalDataStream)

      #Write to our debug log file
      WriteDebugLog("Have just sent the 4 measurements to COSM.  Now calculate costs.") 

      #Now calculate the costs
      CumulativeCost = CalculateCosts(CumToday)
      TotalYesterdayCost = CalculateCosts(TotalYesterday) 
      
      print "Cumulative Cost GBP" + CumulativeCost
      print "TotalCost GBP" + TotalYesterdayCost
      
      #Write to our debug log file
      WriteDebugLog("Have calculated costs. Was cumulative GBP" + CumulativeCost + "and yesterday GBP" + TotalYesterdayCost + ". Now send to COSM") 

      #Send them to COSM
      SendToCOSM(CumulativeCost,MyWattsNowAPIKey,MyFeedID,MyCumulativeCostDataStream)
      SendToCOSM(TotalYesterdayCost,MyWattsNowAPIKey,MyFeedID,MyCostYesterdayDataStream)

      #Write to our debug log file
      WriteDebugLog("Sent costs to COSM.") 

Friday, 21 December 2012

on{X} Traffic Incident Monitoring

A couple of weeks ago I blogged how I'd used on{X} to automate a couple of common tasks based on geo-location (text my Wife when I left work and turn on WiFi at home).  I've also used on{X} to solve another problem in my life, traffic jams!

After suffering a spate of traffic jams (including one that caused my to go on a country lane rally drive) I vowed that I'd use technology to avoid this in future.  You can always check websites before you travel and listen to radio bulletins but this is hit and miss, (i.e. remembering to check the website before you leave).

In the UK, the highways agency publish a bunch of XML feeds showing things like current roadworks, what's showing on the overhead matrix signs and planned roadworks.  See here for the full list.  I chose to use the "unplanned events" feed which uses their road sensor network to warn of incidents.

I've put the full code at the bottom of this posting but in simple terms it just:

1)Detects that I've unlocked the screen of my handset (which I'm doing all the time).
2)Checks that the time is either 6,7,8 in the morning or 4,5,6 in the evening (when I commute).
3)Does a HTTP GET to download the XML feed
4)Parses the feed to pick out a set of roads and place names I care about.  This is controlled by the array:
var MyTrafficArray = ["Birmingham","Wolverhampton",">A34<",">M6<",">M5<"];

So you can just edit the terms in the array to change the set of roads.  The "> <" for the road names means you get an exact match as this is how they're composed in the XML tags, e.g. avoid getting "M6" and "M60" mixed up.

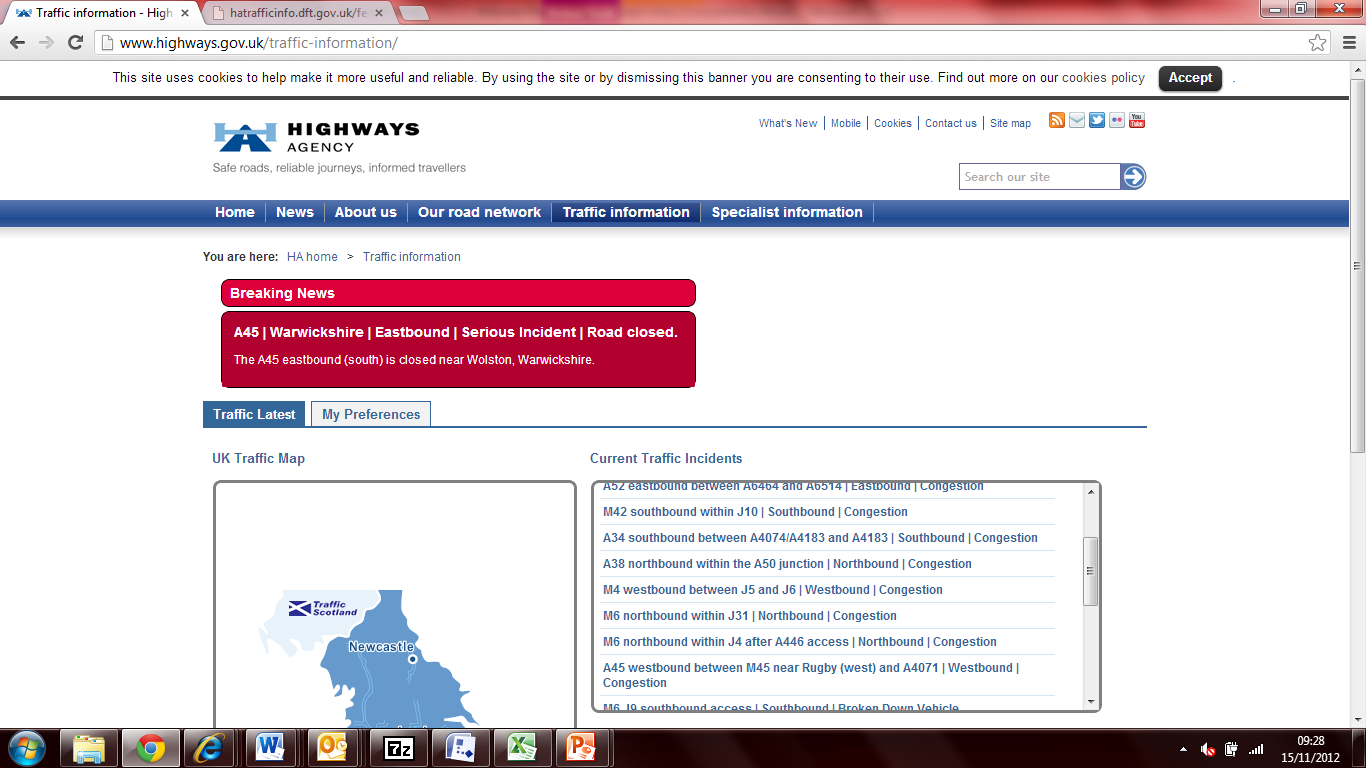
Here's the tool in action.  Firstly, after a screen unlock it warned me that there was a problem on one of the roads:


Then I could just look at the Highways Agency website to get more information:

This warns of the "A34 southbound..." so I could make a judgement as to whether it would impact me.  You can event look at the raw XML, (what the on{X} app parsed} to see more information:


So quite a simple example but there's plenty more tinkering to be had here:
  • Adding a timer rather than relying on a screen unlock.
  • Mixing location/geo-fencing the XML feed to always be warned wherever I am.
  • Playing with some of the other traffic feeds, (variable message signs looks fun).
  • Using some of the other UK Government APIs (e.g. weather and crime). 

Here's the full code listing:

// Every day from 0600 until 0900 and 1600 until 1900, when the screen is unlocked, parse the highways agency XML feed for key words.  Then 
// if you find this, show a notification together with which keyword you found. I then use this to trigger lookign at the AA or similar.

//Variables, here's an array of terms to search for
var HighwaysXMLURL = "http://hatrafficinfo.dft.gov.uk/feeds/datex/England/UnplannedEvent/content.xml";
var MyTrafficArray = ["Birmingham","Wolverhampton",">A34<",">M6<",">M5<"];
var HTTPErrorString = "Error in HTTP";


// Triggers the function when the screen unlocks
device.screen.on("unlock", function(){
//console.log('I have been unlocked');
    //Check whether to call the function.  Based upon time of day
        
    //Call the function to get the XML.  This also further calls a function to parse the XML due to the interesting way this all works...
    if (DetermineWhetherToCheck()) 
      {
      GetTheXML();        
      }
    else
      {
      //Just in for test.  Comment out if all is dandy
      //var MyNotification = device.notifications.createNotification('Not time to check now dude');
      //MyNotification.show();      
      }
});

//Sends for the XML
function GetTheXML(){
    device.ajax(
    {    
      url: HighwaysXMLURL,
      type: 'GET',
      headers: {
         //'Content-Type': 'application/xml'
      }  //End of headers
    },  //End of Ajax  
    function onSuccess(body, textStatus, response) {
      //Set up the response XML
      ParseXMLResponse(body);
      //Log to console that all was good      
      //console.info('successfully received http response!');
      },  //onSuccess
    function onError(textStatus, response) {
      var error = {};
      error.message = textStatus;
      error.statusCode = response.status;
      console.error('error: ',error);
      var MeNotification = device.notifications.createNotification('Highway XML Check had HTTP Error');
        MeNotification.show();
    });    
}  //End of GetTheXML

//Parses the XML response
function ParseXMLResponse(InText){
    //Variables
    var SearchPos;         //Position in the string we are searching
    var MyNotification;    //For when we show a notification
    var HitCount = 0;      //Increases if we find a search term
    
    //Loop through our search term array, seeking a key term
    for (var i = 0; i < MyTrafficArray.length; i++) {
      //See if the search string exists in the XML
      SearchPos = InText.search(MyTrafficArray[i]);
      if (SearchPos > -1){   //-1 means not found, otherwise it's the position
        MyNotification = device.notifications.createNotification('Highway XML Check has spotted: ' + MyTrafficArray[i]);
        MyNotification.show();
        //console.log('Highway XML Check has spotted: ' + MyTrafficArray[i]);
        //Increment our hit count counter
        HitCount++;
      } //End of If 
    }  //End of for loop
    
    //See if we had no hits.  Notify just to be sure
    if (HitCount === 0){
        MyNotification = device.notifications.createNotification('Highway XML checked but found nowt');
        MyNotification.show();
    }
}  //End of function

function DetermineWhetherToCheck()
  {
  //Get the current hour value.  Only check if it's 6,7 or 8 or 16, 17 or 18'          
  //The variable to use for the time
  var currentTime = new Date();
    
  //Form the hours part and check it
  var hours = currentTime.getHours();
  
  if (hours == 6 || hours == 7 || hours == 8 || hours == 16 || hours == 17 || hours == 18)
    {
    return true;    
    }
  else
    {
    return false;    
    }
  }  //End of function


Tuesday, 27 November 2012

Raspberry Pi Powered Lego Car


Want to take your Raspberry Pi some old Lego and build a remote control Lego car?  Well read on as this is the place to find out how to do it!

[Note: This was my original, 2012 era blog post on my Raspberry Pi car.  Read on for basic details as to how I made it.  See here for my 2013 post on how to upgrade it!] 

Two things have happened recently that have contributed to my tinkering hobby.
  • Firstly - My Raspberry Pi arrived after a long (but worth it) wait.
  • Secondly - My two girls (8 and 5) have got in to Lego and so slowly but surely I've been bringing down old Lego that I had when I was a kid, got stored in my parent's loft when I grew up and then got transferred to my loft when my parents had a general chuck out.
The coolest Lego model I had when I was a kid was a the Lego 8860 car chassis.  I brought this down from my loft, dusted it off and over the course of 3 weekends my daughters and I built it.  Here's a picture of it after we'd finished:
The car has lots of great features like rack and pinion steering, movable/reclining seats, a gear box, a differential, rear suspension and even a engine with pistons.

I'm very proud of my childhood self as all the parts were pretty much still there.  A few missing parts were easily replaceable with bits from other sets.  

The only missing part that I couldn't replace was a tiny bevel sprocket from the differential.  However (as I learned) there's a sites on the internet where you can buy old bits.  I used this site for the missing sprocket and for some other stuff I needed (see below).

The final pages of the assembly guide show how you can modify the car to add motors.  I never did this as a kid as I didn't have any Lego motors.  However as an adult with a bit more disposable income and some eager children I bought a few Lego power functions motors (again from the site mentioned above).  They were OK but required a battery box to be hard wired to them that meant you had to crawl along next to the car as it went along which wasn't much fun.

This is where the Raspberry Pi came in.  What if we could control the whole thing with the Raspberry Pi and make a remote control car!  That would be very cool!

Here's a video of the end result.  I'll then tell you how we made it!


A bit of research on the Raspberry Pi forum and other sites showed that people had been able to use the GPIO on the Raspberry Pi to control motors.  However we needed to start off by working out how to use  the Pi to control stuff with the GPIO.

We started off by looking at some simple electronics and Python code to use the GPIO to turn an LED off and on. We used this tutorial to get us started, used a breadboard, and LED and a resistor and wrote some Python code to control the LED.  Here's what it looked like:

Here you can see the Raspberry Pi, main connecting cables and some jumper wires going to a bread board which has an LED and a resistor on it.

GPIO11 goes to the anode on the LED.  The LED cathode connects to a resistor (~330Ohm) which then connects to GPIO6 (Ground). 


My Pi memory card came with Raspbian Wheezy on it and this already had Python installed.  We added a USB WiFi module (just visible on the image above) and configured this using the tool on the X windows desktop.

We created this simple Python script to turn the LED off and on:

#Get the time module
import time

#Get rid of warnings
GPIO.setwarnings(False)

#Set mode of numbering of pins
GPIO.setmode(GPIO.BOARD)

#Set pin 11 as an output
GPIO.setup(11,GPIO.OUT)

#Loop, changing the state
while 1:
  #Now set it high
  GPIO.output(11,True)

  #Wait a sec!
  time.sleep(1)

  #Now set it low
  GPIO.output(11,False)

  #Wait a sec!
  time.sleep(1)

It was called gpio_1.py so you type sudo python gpio_1.py to run the script.

So in researching motor control, the general advice was that motors require too much voltage and current to be driven directly from the Raspberry Pi.  The most common advice was to use a motor controller chip and this pre-made board seemed to have everything we needed.  So I bought one!

The board is based on a L298N motor controller and can be used to control a pair of motors.  Features:
  • A pair of inputs that can be controlled by TTL logic levels (like the Raspberry Pi uses).
  • Connections for a 9Volt battery.
  • A pair of outputs to connect to the DC motors.
So if input 1 is high and input 2 is low, the motor turns in one direction.  Input 1 low and input 2 high turns the motor in the other direction.  So for example the script shown above would make the motor turn for a second, pause for, turn for a second and so on.

Next challenge, connect the motor controller to the Lego motors:

The Lego power functions motors have stack-able connectors.  This site describes the motors in more detail and shows the pin out for the connectors.  

The two central pins are used to control the forward and back motion of "medium" motors that I bought.  The image shows how you can gently prize the pins of the connectors back and insert a single core wire. A modified (with a knife!) Lego tile holds the wires in place.

The image below shows the test jig for the Raspberry Pi, motor controller and the motors:

Here you can see the Raspberry Pi (on the left), 4 jumper wires going from the GPIO to the motor controller inputs, a jumper wire going to the motor controller ground, a battery connector and then the connections to the motors.  a script not unlike the one shown above was used to test that both motors worked.  They did!!


A (hand drawn - sorry) schematic for the system is shown below:

The next challenge was making the Raspberry Pi "mobile". We already had a WiFi USB adapter for IP connectivity but the Raspberry Pi needs a) power from a 5V micro USB supply and b) a connection to a TV or monitor via HDMI or S video.  To get over the power issue we bought a 5V re-chargeable battery; the sort you can get to re-charge a mobile 'phone.  We bought a Powergen 5200mAh re-chargeable unit which seemed like it would do the job for this but was also small enough to fit in a pocket which might be useful for other tinkering...

We couldn't have a hulking great cable linking the Pi to a monitor so I simply installed PuTTY on my PC and enabled SSH on the Raspberry Pi via the start-up utility.  PuTTY enables you to have a remote terminal session on the Pi and, by fixing the IP address on my WiFi router config. I always know which address to SSH to.

The last thing to sort out was connecting the motors to the Lego car. The motor to drive the wheels was easy enough, we just removed the engine parts and inserted one of the motors (as per 1980s instructions).  The steering was trickier as we needed to gear down the motor else it would just spin wildly and not have enough torque to turn the wheels.  To do this we built a little Lego gearbox:

From the image you can see that there's 3 pairs of small cog - medium cog pairings which gears down the motor speed nicely.  It needs a bit of a tidy up but it does the job for now.


So all the bits were ready, we just needed to assemble the car and write some Python code to control the motors.  Here's the car with all the kit stacked on it:

The seats had to be removed but the RasPi plus battery sit nicely on one side and the motor controller and it's battery sit nicely on the other side.


The first script I wrote was this:

#These are the keyboard mappings
#q = Go forward
#a = Stop going forward or back
#z = Go back
#i= Go left
#o = Stop steering
#p = Go right

#Get the GPIO module
import RPi.GPIO as GPIO

#Get the time module
import time

#A routine to control a pair of pins
def ControlAPairOfPins(FirstPin,FirstState,SecondPin,SecondState):
  print "Controlling them pins"
  if FirstState == "1":
    GPIO.output(int(FirstPin),True)
  else:
    GPIO.output(int(FirstPin),False)

  if SecondState == "1":
    GPIO.output(int(SecondPin),True)
  else:
    GPIO.output(int(SecondPin),False)
  #Just retur
  return

####Main body of code

#Get rid of warnings
GPIO.setwarnings(False)

#Set the GPIO mode
GPIO.setmode(GPIO.BOARD)
#Set the pins to be outputs
GPIO.setup(11,GPIO.OUT)
GPIO.setup(13,GPIO.OUT)
GPIO.setup(19,GPIO.OUT)
GPIO.setup(21,GPIO.OUT)

while True:
  MyChar = raw_input("Press a character:")
  print "You pressed: " + MyChar
  if MyChar == "q":
    ControlAPairOfPins("19","1","21","0")
    print "Forward"
  elif MyChar == "a":
    ControlAPairOfPins("19","0","21","0")
    print "Stop"
  elif MyChar == "z":
    ControlAPairOfPins("19","0","21","1")
    print ("Back")
  elif MyChar == "i":
    ControlAPairOfPins("11","1","13","0")
    print "Left"
  elif MyChar == "o":
    ControlAPairOfPins("11","0","13","0")
    print "Stop steering"
  elif MyChar == "p":
    ControlAPairOfPins("11","0","13","1")
    print "Right"
  else:
    print "Not a command"

So we used the keyboard (via SSH) to control the motors.  q,a,z made the car go forward, stop and back, (look at how they line up on a keyboard).  i,o,p made the car go left, stop steering and right (again look at the keyboard).  the raw_input() method is used to capture what the user types on the keyboard.  This is then mapped to the GPIO pins and whether they need to be high or low.  The ControlAPairOfPins() function is then called to set the state of the GPIO pins.  The code is a bit clunky but it worked and enabled us to control the motors via the SSH session.  The main downside was that raw_input()requires you to type enter after the character meaning it's a bit of a pain to remember the character, type it, press enter etc.

So we needed a better solution and this came from my old friend SL4A, (see previous posting).  Using this we could get an Android handset to communicate with the Raspberry Pi and control the motors.  SL4A gives access to all the Android sensors so we decided to use the position sensor, meaning we could tilt the handset forward and back (to make the car go forward and back) and left and right (to steer left and right).  a crazy idea but it just might work! 

First we needed to think about how the Android handset would communicate with the RasPi.  For my LightwaveRF kit I've sent command in UDP segments so I decided to do that again, (i.e. send from handset to Raspberry Pi using my home WiFi).  The protocol I decided on was simple.  Rather than typing q,a,z,i,o,p on the keyboard I would send this in UDP segments from the handset to the RasPi. The code to do this is below.  All I did was to import the socket module and put a socket listener within a while loop (rather than raw_input().  If the UDP socket receives a character then this is used to control a pair of pins.

#These are the keyboard mappings
#q = Go forward
#a = Stop going forward or back
#z = Go back
#i= Go left
#o = Stop steering
#p = Go right

#Get the GPIO module
import RPi.GPIO as GPIO

#Get the time module
import time

#Get the socket module
import socket

#Some IP constants for this, the server
UDP_IP = "192.168.0.5"
UDP_PORT= 8888

#A routine to control a pair of pins
def ControlAPairOfPins(FirstPin,FirstState,SecondPin,SecondState):
  print "Controlling them pins"
  if FirstState == "1":
    GPIO.output(int(FirstPin),True)
  else:
    GPIO.output(int(FirstPin),False)

  if SecondState == "1":
    GPIO.output(int(SecondPin),True)
  else:
    GPIO.output(int(SecondPin),False)
  #Just retur
  return

####Main body of code

#Get rid of warnings
GPIO.setwarnings(False)

#Set the GPIO mode
GPIO.setmode(GPIO.BOARD)
#Set the pins to be outputs
GPIO.setup(11,GPIO.OUT)
GPIO.setup(13,GPIO.OUT)
GPIO.setup(19,GPIO.OUT)
GPIO.setup(21,GPIO.OUT)

#Set up the IP related details
sock = socket.socket(socket.AF_INET, socket.SOCK_DGRAM) # UDP
sock.bind((UDP_IP, UDP_PORT))

#Tell the user we've started
print "UDP server started.  Waiting for response...."

while True:
  #Wait for a UDP command to be received
  print "Waiting for a UDP command"

  #Handles getting a UDP packet
  MyChar, addr = sock.recvfrom(1024) #buffer size is 1024

  #MyChar = raw_input("Press a character:")

  print "I received: " + MyChar

  if MyChar == "q":
    ControlAPairOfPins("19","1","21","0")
    print "Forward"
  elif MyChar == "a":
    ControlAPairOfPins("19","0","21","0")
    print "Stop"
  elif MyChar == "z":
    ControlAPairOfPins("19","0","21","1")
    print ("Back")
  elif MyChar == "i":
    ControlAPairOfPins("11","1","13","0")
    print "Left"
  elif MyChar == "o":
    ControlAPairOfPins("11","0","13","0")
    print "Stop steering"
  elif MyChar == "p":
    ControlAPairOfPins("11","0","13","1")
    print "Right"
  else:
    print "Not a command"

Looking at the handset side of things, we needed to learn how to detect the state of the handset sensors.  This simple tutorial shows how to do it.  The tutorial shows how to read all the sensors (magnometer, accelerometer, position sensor, light sensor) but I only wanted to use the position sensor. Running a line of code like this  s6 = droid.sensorsReadOrientation().result gives a result with 3 values which are [azimuth, pitch, roll].  From experimentation we observed that tilting the handset forward and back changed the pitch value and side to side changed the roll value (like an aeroplane I guess).

So all the Python script needed to do was read the position, check it against some thresholds and determine if it had changed.  If it had changed then I just needed to send the associated letter in a UDP segment.  here's the code:


#All the import statemets
import socket           #For UDP
import time             #For time
import android          #Android environment

#Our Droid entity
droid = android.Android()

#Some constants related to IP
UDP_IP = '192.168.0.5'
UDP_PORT = 8888
INET_ADDR = (UDP_IP,UDP_PORT)

#Some constants relating to direction.  These come from what I originally did on a keyboard
MoveForward= "q"
MoveBack = "z"
MoveStop = "a"
SteerLeft = "i"
SteerRight = "p"
SteerStop = "o"

#Some constants relating to thresholds.  Can be used to tune sensitivity
ForwardThresh = 0.3     #> This means you're tilted forward
BackwardThresh = -0.3   #< This means you're tilted backwards
LeftThresh = -0.4       #< This means you're tilted left
RightThresh = 0.4       #> This means you're tilted right 

######################################
#Main part of the code
######################################

#Initialise the movement and steering state
MoveState = MoveStop
SteerState = SteerStop

#Use these variables to get the current state
CurrentMove = ""
CurrentSteer= ""

#Print port information
print "UDP target IP:", UDP_IP 
print "UDP target port:", UDP_PORT 

#Set up the socket
sock = socket.socket(socket.AF_INET, socket.SOCK_DGRAM)

#Start sensing the Android sensors. Has a timer to allow the sensors to spark up
droid.startSensingTimed(1, 250)
time.sleep(1)

#Loop, detecting state and sending UDP
while True:
  #Use a try statement and add some error handling as well
  try:  
    #Read the sensor state     
    s1 = droid.sensorsReadOrientation().result  
    
    #The result is a list made up of float variables.  Presented as a CSV on screen but we can mathematically manipulate
        
    #Set up the current states based upon the thresholds defined as constants - First for forward and back
    if s1[1] > ForwardThresh:
      CurrentMove = MoveForward
    elif s1[1] < BackwardThresh:
      CurrentMove = MoveBack
    else: CurrentMove = MoveStop

    #Now do it for left and right
    if s1[2] > RightThresh:
      CurrentSteer = SteerRight
    elif s1[2] < LeftThresh:
      CurrentSteer = SteerLeft
    else: CurrentSteer = SteerStop

    #So we've got the current state, now check with the overall logged state.  If it's changed, we do some UDP fun
    #First check the forward / back state
    if CurrentMove == MoveState:
      #Do nothing
      CurrentMove = CurrentMove    #Seems necessary other you get an error
    else:
      #Now we need to send UDP and update the overall state
      MoveState = CurrentMove
      sock.sendto(CurrentMove, INET_ADDR)
      print "Forward / back state changed.  Sent: " + CurrentMove      
    
    #Now the left / right state
    if CurrentSteer == SteerState:
      #Do nothing
      CurrentSteer = CurrentSteer    #Seems necessary other you get an error 
    else:
      #Now we need to send UDP and update the overall state
      SteerState = CurrentSteer
      sock.sendto(CurrentSteer, INET_ADDR)      
      print "Left / right state changed.  Sent: " + CurrentSteer
   
      #Chill for a sec
      time.sleep(1)
  except Exception, err: #Handle exceptions
    #Write a screen with the error
    print "Got us an exception: " + str(err)   
    time.sleep(1)


As the video shows it works OK.  It needs tuning to speed the car up, change the tilt sensitivity on the handset but overall it's good.  We now need to work out other ways of controlling the car with the Raspberry Pi.