Monday, 30 January 2017

Alexa "Movie Expert" Skill Using a Slot, Python and the OMDB API

More on my series of blog posts on using the Amazon Echo Dot and creating Alexa skills.

After creating my last Alexa skill that used Python and an API, I wanted to extend this by creating a skill that could massively vary it's response based upon what the user asked it.  i.e. Didn't just do one thing or respond with one of a limited set of pre-defined responses.

The result is my Amazon Movie Expert skill which aims to be able to provide information on any movie (within reason).  Best to see it in action first!


I don't go back to basics in this post about creating Alexa skills.  Please look at one of my old posts or the tutorials on the interwebs for more on that.

A key point is that all the movie information comes from the Open Movie Database (OMDB) API which can be found here.  All credit to the people who maintain that API.  It's excellent!

The idea is that you're able to say something like "Alexa, ask movie expert about the movie Sing".  To understand how Alexa interprets this, let's break down what was asked:

  • "movie expert" is the invocation name that you configure.
  • "about the movie" is the first part of the utterance and this is configured to map to a Alexa "intent".  This basically points to a function in your Lambda handler.
  • "sing" is called a slot.  This is effectively a parameter that is passed to the Lambda handler.  

So your utterances in the interaction model look something like this:


So the intent is MovieIntent and {MovieName} is your slot.  This means the words spoken at the end of the utterance can be any movie name.

You then define the intent structure as:

So here we define that the MovieIntent intent has a slot called MovieName.  We also say it's of type "Amazon.Movie".  Slots seem to either be built-in or user defined custom slots where what the user can say is pre-defined by the developer.  I think the built-in slot type of AMAZON.Movie tells Alexa to expect a movie name to be spoken and so narrows down the range of words Alexa must interpret, thus improving accuracy.  There's a whole set of built-in slots for you to use.

This means that the movie name spoke at the end of the utterance is passed to the AWS Lambda function as a parameter.  You then write a function to handle the request.  Here's a laughably simple architecture diagram showing how it all fits together:


Below is the Python function that handles MovieIntent.  Key points:

  • Many attributes of the intent are passed to the function in the parameter "intent".
  • You can assign the slot to a variable by accessing intent['slots']
  • The function then forms a URL, passes it to the open movie database (OMDB) and captures the response
  • The response is in JSON format.  Key elements are extracted and form the string that Alexa reads back to the user.


#This is the main function to handle requests for movie information
def get_movie_info(intent, session):
    card_title = intent['name']
    session_attributes = {}
    should_end_session = True  

    if 'MovieName' in intent['slots']:
        #Get the slot information
        MovieToGet = TurnToURL(intent['slots']['MovieName']['value'])
        
        #Form the URL to use
        URLToUse = OmdbApiUrl + MovieToGet + UrlEnding
        print("This URL will be used: " + URLToUse)
        
        try:
          #Call the API
          APIResponse = urllib2.urlopen(URLToUse).read()
        
          #Get the JSON structure
          MovieJSON = json.loads(APIResponse)
        
          #Form the string to use
          speech_output = "You asked for the movie " + MovieJSON["Title"] + ".  " \
                          "It was release in " + MovieJSON["Year"] + ".  " \
                          "It was directed by " + MovieJSON["Director"] + ".  " \
                          "It starred " + MovieJSON["Actors"] + ".  " \
                          "The plot is as follows: " + MovieJSON["Plot"] + ".  " \
                          "Thank you for using the Movie Expert Skill.  "
        except:
            speech_output = "I encountered a web error getting information about that movie.  " \
                            "Please try again."  \
                            "Thank you for using the Movie Expert Skill.  "
    else:
        speech_output = "I encountered an error getting information about that movie.  " \
                        "Please try again."  \
                        "Thank you for using the Movie Expert Skill.  "

    reprompt_text = None
    
    return build_response(session_attributes, build_speechlet_response(
        card_title, speech_output, reprompt_text, should_end_session))

#Takes the information from the slot and turn it into the format for the URL which 
#puts + signs between words
def TurnToURL(InSlot):
  print(InSlot)    
  
  #Split the string into parts using the space character    
  SplitStr = InSlot.split()
  
  OutStr = ""   #Just initialise to avoid a reference before assignment error
   
  #Take each component and add a + to the end   
  for SubStr in SplitStr:
    OutStr = OutStr + SubStr + "+"
      
  #Just trim the final + off as we don't need it
  return OutStr[:-1]

Monday, 23 January 2017

Amazon Alexa Skill with Python and Strava API

In my last post I described how I'd followed a step-by-step guide to create a Amazon Alexa Skill for my Amazon Echo Dot.  This used Node.js and was basically an easy "join-the-dots" guide to creating your first skill and getting it certified.

Building on this I wanted to build a skill that:

  1. Uses Python - my language of choice.
  2. Calls an API (rather than just responding with pre-canned data).
  3. Teaches me more about how to configure skills to do different things.

Here's the skill in action.  I'll then describe how I made it:


To start with I used the Amazon Python "Colour Expert" skill which can be found here.  Follow this if it's your first time with an Alexa skill as it will show you how to use the Amazon Developer site and Amazon Web Services Lambda to create a skill using Python.

My idea was to modify this skill to fetch and read out data from my Strava (exercise logging) account.  I've previously blogged on using the Strava API in posts like this and this.

To modify the Colour Expert skill I initially did the following on the Amazon Developer site on the "Skill Information" tab:

  • Name = "Sports Geek Stuff".  This is just what you'd see on the Alexa smartphone app if you published the skill.
  • Invocation name = "sports geek".  This is what say to Alexa to specify you're using a particular skill.  So you'd start by saying "Alexa, ask sports geek" then subsequent words define what you want the skill to do.

I then added extra configuration on the "Interaction Model" tab to define how I should interact with the skill to get the Strava data.

The "Intent Schema" basically creates a structure that maps things you say to Alexa to the associated functions that you run in the AWS Lambda Python script (more on this below).  I added the following to the bottom of the Intent Schema.

    {
      "intent": "StravaStatsIntent"
    } 

I then defined an utterance (so basically a thing you say) that links to this intent.  The utterance was:

StravaStatsIntent for strava stats

...which basically means, when you say "Alexa, ask sports geek for strava stats" then Alexa calls the associated Python script in AWS Lambda with the parameter "StravaStatsIntent" to define what function to call.

Apart from ace voice to text translation, there's very little intelligence here.  You could configure:

StravaStatsIntent for a badger's sticker collection

...or even...

StravaStatsIntent for brexit means brexit

...and these crazy sayings would still result in the StravaStatsIntent being selected.

You also configure the Alexa skill to map to a single AWS Lambda function which will handle all the intents you configure.  So in simple terms a invocation name selects a Alexa skill which is linked to an AWS Lambda function.  Then utterances are configured that link to intents, each of which is handled by the Lambda function.

Here's a simple diagram of how it all  hangs together:


So next you have to edit the Python Lambda function to handle the intents.  I left the colour expert
skill as is and just added code for my Strava intent.  There is some other interesting aspects of the Python script that I'll explore later (these are slots and session handling) so I didn't want to remove this.

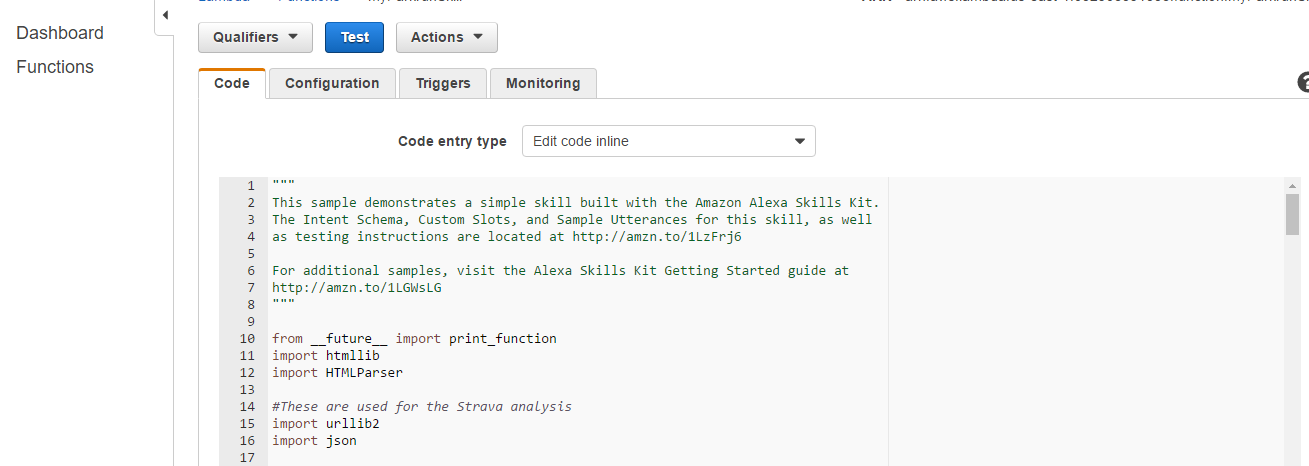
To modify the code I went to AWS, logged in, selected Lambda and chose to edit the code inline.  This gave me a screen like this that I could use to edit the Python script:


To modify the code I firstly added references to the Python urllib2 and json modules as I need to use these, (you can see them in the image above).

I also added my Strava developer API key and a Unix timestamp to use for the API call as constants.

I then edited the on_intent function to specify that the StravaStatsIntent would be passed.  This is shown in red below.

    # Dispatch to your skill's intent handlers
    if intent_name == "MyColorIsIntent":
        return set_color_in_session(intent, session)
    elif intent_name == "WhatsMyColorIntent":
        return get_color_from_session(intent, session)
    elif intent_name == "AMAZON.HelpIntent":
        return get_welcome_response()
    elif intent_name == "AMAZON.CancelIntent" or intent_name == "AMAZON.StopIntent":
        return handle_session_end_request()
    elif intent_name == "StravaStatsIntent":
        return handle_strava()    
    else:
        raise ValueError("Invalid intent")

I then created the handle_strava() function, all of which is shown below.  Yes, I know my code is clunky!

Key points here are:
  • Making the API call using urllib2 and getting a response
  • Parsing the JSON and building an output string
  • Not using  reprompt_text which could be used to prompt the user again as to what to say
  • Setting should_end_session to true as we don't want the session to continue beyond this point
  • Calling the build_response function to actually build the response to pass back to the Alexa skill


#Get us some Strava stats
def handle_strava():
    """ If we wanted to initialize the session to have some attributes we could
    add those here
    """

    session_attributes = {}
    card_title = "parkrun"
    
    #Access the Strava API using a URL
    StravaText = urllib2.urlopen('https://www.strava.com/api/v3/activities?access_token=' + StravaToken + '&per_page=200&after=' + TheUnixTime).read()
    
    #Parse the output to get all the information.  Set up some variables
    SwimCount = 0
    SwimDistance = 0
    RunCount = 0
    RunDistance = 0
    BikeCount = 0
    BikeDistance = 0

    #See how many Stravas there are.Count the word 'name', there's one per record
    RecCount = StravaText.count('name')

    #Load the string as a JSON to parse
    StravaJSON = json.loads(StravaText)

    #Loop through each one
    for i in range(0,RecCount):
      #See what type it was and process accordingly
      if (StravaJSON[i]['type'] == 'Swim'):
        SwimCount = SwimCount + 1
        SwimDistance = SwimDistance + StravaJSON[i]['distance']
      elif (StravaJSON[i]['type'] == 'Ride'):
        BikeCount = BikeCount + 1
        BikeDistance = BikeDistance + StravaJSON[i]['distance']
      elif (StravaJSON[i]['type'] == 'Run'):
        RunCount = RunCount + 1
        RunDistance = RunDistance + StravaJSON[i]['distance']
    
    #Turn distances into km
    SwimDistance = int(SwimDistance / 1000)
    BikeDistance = int(BikeDistance / 1000)
    RunDistance = int(RunDistance / 1000)
    
    #Build the speech output
    speech_output = 'Swim Count = ' + str(SwimCount) + '. Swim Distance = ' + str(SwimDistance) + " kilometres.  "
    speech_output = speech_output + 'Bike Count = ' + str(BikeCount) + '. Bike Distance = ' + str(BikeDistance) + " kilometres.  "
    speech_output = speech_output + 'Run Count = ' + str(RunCount) + '. Run Distance = ' + str(RunDistance) + " kilometres."
    
    # If the user either does not reply to the welcome message or says something
    # that is not understood, they will be prompted again with this text.
    # Now we set re-prompt text to None.  See notes elsewhere for what this means
    #reprompt_text = "Please tell me your favorite color by saying, " \
    #                "my favorite color is red."
    #This could be set to false of you want the session to continue
    should_end_session = True
    reprompt_text = None

    return build_response(session_attributes, build_speechlet_response(
        card_title, speech_output, reprompt_text, should_end_session))


You can test if you have a Amazon Echo device or just test using the Alexa Skills Kit test capability.


Sunday, 15 January 2017

My First Amazon Alexa Skill

Recently I bought an Amazon Echo Dot as my colleagues had been raving about them.  Oh, my, what an excellent piece of kit it is.  As long as you speak clearly and think about the clarity of the words you use then the Alexa voice recognition system rarely fails.

There's plenty of reviews about Alexa and the Echo Dot on the interweb so I won't go into general usage here.  (Although the Easter Eggs are excellent fun).

As a Geek, my main driver for buying an Echo Dot was to write my own Alexa Skills.  I started using this tutorial and it's so super easy!  Usually I'd talk through the tutorial in detail on this blog but it was so easy it's not worth going through the detail of this.

What I will do is provide an super-simple "architectural" diagram of how it all works.  Here it is:

So in simple terms, to create a skill you:

  1. Configure the skill and associated attributes in the Amazon Skills Kit from the Amazon Developer site.  This is generally about the language you'll use to interact with the skill.  The site also takes you through all the workflow from defining your Skill to testing it then certifying it.
  2. Define a function in Amazon Web Services Lambda to actually handle the logic behind your Alexa skill.

(Note you don't have to use AWS Lambda, you can define your own web service and logic to interact with the Alexa Skills Kit.  Additionally the function that handles the Alexa logic can make calls out to the internet to gather further information to augment your skill, can write to databases etc).

The tutorial mentioned above is super easy to follow.  The only step I vaguely had trouble with is where it covers setting up a node.js environment but I managed to do this by following the steps super carefully.

So I developed the skill, tested it, had it certified by Amazon and now it's available on the Amazon Alexa app to be enabled by anyone with an Echo or Echo Dot.  Proud times!  (I do realise that this was super easy to do so I shouldn't boast too much!).


Here's a video of it in action:


Sunday, 8 January 2017

Using the Resources of the Fitbit API

In previous posts I've covered the basics of using a Raspberry Pi and the Fitbit API to extract and analyse the data created by a Fitbit Fitness tracker.  In particular, in this post I covered using OAUTH2.0 to access the API.

For this post I thought I'd do a more general overview of the range of data available through the Fitbit API.  So go back to the OAUTH2.0 post to see how to get access and refresh tokens etc.  Then come back here to see what you can do with the API.

Once you've got the required tokens, all you need to do to access data is specify different URLs.  In this post I'll describe a range of URLs that can be used to access different data.  There's a massive variety of data available and almost limitless combinations so just use this as a set of worked examples then use the Fitbit Developer documentation to work out other options.

Remember I'm just a guy that does this for a hobby and likes to help other people along the way.  If I use the wrong terms or describe things in a less than 100% accurate manner then please take this in the right spirit or even comment below to help me correct matters.

Activity Data
The most generic data available from the API.  Here's a simple URL to give you summary of activity data for a given date:

https://api.fitbit.com/1/user/-/activities/date/2016-12-27.json

So a simple base URL and extra elements to specify "activities" and a date to get data for.  This yields:

{"activities":[],"goals":{"activeMinutes":30,"caloriesOut":2812,"distance":8.05,"floors":25,"steps":10000},"summary":{"activeScore":-1,"activityCalories":1952,"caloriesBMR":1725,"caloriesOut":3353,"distances":[{"activity":"total","distance":16.93},{"activity":"tracker","distance":16.93},{"activity":"loggedActivities","distance":0},{"activity":"veryActive","distance":13.18},{"activity":"moderatelyActive","distance":0.59},{"activity":"lightlyActive","distance":3.16},{"activity":"sedentaryActive","distance":0}],"elevation":155.45,"fairlyActiveMinutes":15,"floors":51,"heartRateZones":[{"caloriesOut":1546.2586,"max":89,"min":30,"minutes":793,"name":"Out of Range"},{"caloriesOut":271.2272,"max":124,"min":89,"minutes":47,"name":"Fat Burn"},{"caloriesOut":21.8036,"max":151,"min":124,"minutes":2,"name":"Cardio"},{"caloriesOut":861.961,"max":220,"min":151,"minutes":57,"name":"Peak"}],"lightlyActiveMinutes":206,"marginalCalories":1332,"restingHeartRate":55,"sedentaryMinutes":725,"steps":17309,"veryActiveMinutes":83}}

So even with it in JSON format you can see some of the key Fitbit metrics that are returned (I've marked these in red).

Step Data
The main reason people get their Fitbit is to count their steps!

Here's a simple example of a URL that provides data for 7 days up to and including the date you specify:

https://api.fitbit.com/1/user/-/activities/steps/date/2016-12-27/7d.json"

The response is as follows:

{"activities-steps":[{"dateTime":"2016-12-21","value":"16156"},{"dateTime":"2016-12-22","value":"9075"},{"dateTime":"2016-12-23","value":"7963"},{"dateTime":"2016-12-24","value":"18698"},{"dateTime":"2016-12-25","value":"11316"},{"dateTime":"2016-12-26","value":"11473"},{"dateTime":"2016-12-27","value":"17309"}]}

So here you can see the 7 measurements and how the value for 2016-12-27 matches that of the activity data above.

You could get the same data but by specifying a start and end date by using:

https://api.fitbit.com/1/user/-/activities/steps/date/2016-12-21/2016-12-27.json

If you ask Fitbit nicely they will give you access to intraday data.  See here for more details on how to do this.  An example URL to get 15 minute segments for a single day is:

https://api.fitbit.com/1/user/-/activities/steps/date/2016-12-27/1d/15min.json

Which gives data like this:

{"activities-steps":[{"dateTime":"2016-12-27","value":"17309"}],"activities-steps-intraday":{"dataset":[{"time":"00:00:00","value":0},{"time":"00:15:00","value":0},{"time":"00:30:00","value":0},{"time":"00:45:00","value":0},{"time":"01:00:00","value":0},{"time":"01:15:00","value":0},

...not that interesting for this time period as I was asleep.  It gets better later in the day when I went for a run!

{"time":"08:45:00","value":350},{"time":"09:00:00","value":2016},{"time":"09:15:00","value":2522},{"time":"09:30:00","value":2508},{"time":"09:45:00","value":2555},{"time":"10:00:00","value":628}

Other Measurements
You can use the same URL structure for other key tracker metrics like:

/calories
/distance
/floors

(i.e. replace "/steps" in the above examples with these words).

Sleep
If you have a tracker that measures sleep then you can use a URL like the one below to get sleep data:

https://api.fitbit.com/1/user/-/sleep/date/2016-12-27.json

Which gives data like this at the start:

{"sleep":[{"awakeCount":4,"awakeDuration":4,"awakeningsCount":32,"dateOfSleep":"2016-12-27","duration":29580000,"efficiency":88,"isMainSleep":true,"logId":13314423872,"minuteData":[{"dateTime":"22:38:00","value":"2"},{"dateTime":"22:39:00","value":"3"},{"dateTime":"22:40:00","value":"1"},{"dateTime":"22:41:00","value":"1"},{"dateTime":"22:42:00","value":"1"},{"dateTime":"22:43:00","value":"1"}

So some generic information then (by default) a record for every minute of your sleep.  Here the values are:
1=Asleep
2=Awake
3=Really awake

Then a summary at the end:

"summary":{"totalMinutesAsleep":434,"totalSleepRecords":1,"totalTimeInBed":493}}

Heart Rate
Finally, if you have a tracker that also measures heart rate you can use a URL like the one below to get data:

https://api.fitbit.com/1/user/-/activities/heart/date/2016-12-27/1d.json


{"activities-heart":[{"dateTime":"2016-12-27","value":{"customHeartRateZones":[],"heartRateZones":[{"caloriesOut":1546.2586,"max":89,"min":30,"minutes":793,"name":"Out of Range"},{"caloriesOut":271.2272,"max":124,"min":89,"minutes":47,"name":"Fat Burn"},{"caloriesOut":21.8036,"max":151,"min":124,"minutes":2,"name":"Cardio"},{"caloriesOut":861.961,"max":220,"min":151,"minutes":57,"name":"Peak"}],"restingHeartRate":55}}],"activities-heart-intraday":{"dataset":[{"time":"00:00:00","value":65},{"time":"00:01:00","value":65},{"time":"00:02:00","value":65},{"time":"00:03:00","value":65},{"time":"00:08:00","value":65},{"time":"00:09:00","value":65},{"time":"00:10:00","value":65},{"time":"00:11:00","value":64},{"time":"00:12:00","value":64},{"time":"00:13:00","value":65},{"time":"00:14:00","value":66},{"time":"00:15:00","value":64},{"time":"00:16:00","value":61},

So first some general data then some measurements at up to one minute intervals (if you have access to this data).

Summary
So that was a whistle-stop tour of using the API.  Have a play, use different URLs and see what you can get!

10 Most Boring Things Video

My children watch a lot of YouTube videos.  (Some might say too many).  Some of the videos are along the lines of "10 most awesome <something>" where <something> is amusement park rides or water flumes.

Being a bit of a contrary chap i though it would be fun to do a video along the lines of "10 most boring things".  And here it is:


I captured the video on my Canon Digital SLR and edited it using Cyberlink PowerDirector 12.0.  It was super-easy and a lot of fun to do together.  The hardest thing was not making the components of the video too interesting!!


Friday, 2 December 2016

Garmin ConnectIQ - First Attempt at Using the SDK

The Garmin Forerunner 910XT that I have previously blogged about using died a death a couple of weeks ago so I decided to buy a Garmin Fenix 3 which has roughly the same feature set.  The big selling point for a geek like me was the Connect IQ capability that means you can write apps for the watch.  Geektastic!

Overall ConnectIQ let's you write:

  • Fully blown apps
  • Watch faces
  • Widgets
  • Data fields

...so really customising your Garmin product.

Some resources I used to get myself setup:


In particular I spent a long time going through the Getting Started section of the Programmer's Guide.  I'm generally pretty gung ho and like to go it alone but it was worth going through this slowly step-by-step.  I chose to use Eclipse (Luna) and followed the tutorial to produce a simple watch face and load it into the emulator. I won't repeat the steps here as the ones Garmin provide are extremely good.

I then decided to modify the watch face in some way to learn more about ConnectIQ.  My idea was to provide a "countdown until parkrun" watch face.  Keen readers will know I like a bit of parkrun so I decided to do a watch face that both shows you the current time and, as time passes, counts down the days, minutes, hours and seconds until parkrun.

To modify the watch face I just had to change two files within the Eclipse project.  These are selected on the Project Explorer view below.

In simple terms, layout.xml defines the layout of the watch face and the xxxView.mc file contains the code required to modify aspects of the watch face.

For the layout I decided to have a simple one of:

  • The current time at the top
  • Then a count down until parkrun
  • Then some text to say "until parkrun"
  • Then some form of "motivational" slogan

The layout.xml for this looks like:

<layout id="WatchFace">
    <label id="TimeLabel" x="center" y="50" font="Gfx.FONT_LARGE" justification="Gfx.TEXT_JUSTIFY_CENTER" color="Gfx.COLOR_BLUE" />
    <label id="TimeToParkrunLabel" x="center" y ="100" font="Gfx.FONT_SMALL" justification="Gfx.TEXT_JUSTIFY_CENTER" color="Gfx.COLOR_RED" />
    <label id="ParkrunTextLabel" x="center" y ="125" font="Gfx.FONT_SMALL" justification="Gfx.TEXT_JUSTIFY_CENTER" color="Gfx.COLOR_RED" /> 
    <label id="SloganTextLabel" x="center" y ="160" font="Gfx.FONT_SMALL" justification="Gfx.TEXT_JUSTIFY_CENTER" color="Gfx.COLOR_GREEN" />
</layout>

Here we see four labels with their name, position on screen, font size and colour defined.

Without changing anything in the view.mc file, this function references the layout file and tells ConnectIQ what to draw on screen:

function initialize() {
        WatchFace.initialize();
    }

    // Load your resources here
    function onLayout(dc) {
        setLayout(Rez.Layouts.WatchFace(dc));
    } 

Where the WatchFace reference links to the layout.xml contents.

The first function I changed was the "onUpdate" one.  Here it is:

    // Update the view
    function onUpdate(dc) {
        // Get and show the current time
        var clockTime = Sys.getClockTime();
        var timeString = Lang.format("$1$:$2$:$3$", [clockTime.hour, clockTime.min.format("%02d"),clockTime.sec.format("%02d")]);
        var view = View.findDrawableById("TimeLabel");
        view.setText(timeString);
        
        //Time to park run
        var TimeToParkrunStr = CalcTimeToParkrun();
        var ParkrunTimeView = View.findDrawableById("TimeToParkrunLabel");
        ParkrunTimeView.setText(TimeToParkrunStr);
        
        //Added by Paul Weeks
        var ParkrunLabelStr = "...until next parkrun!";
        var ParkrunLabelView = View.findDrawableById("ParkrunTextLabel");
        ParkrunLabelView.setText(ParkrunLabelStr);
        
        //This is a slogan at the bottom.  Could change dynamically in future
        var SloganStr = "#DFYB";
        var SloganLabelView = View.findDrawableById("SloganTextLabel");
        SloganLabelView.setText(SloganStr);
        
        // Call the parent onUpdate function to redraw the layout
        View.onUpdate(dc);
    }

Here we can see some simple concepts that show how to update the screen and show the time.  Breaking it down:

1)Create a variable to hold the current time:
var clockTime = Sys.getClockTime();

2)Turn this into a string.  The Lang.format method can be used for this.  Here we see it used to create a string with three components (referenced as $1$:$2$:$3$) formed from the hour, second and min part of the time.  The %02d part simply puts a leading zero on to pad numbers less than 10:

var timeString = Lang.format("$1$:$2$:$3$", [clockTime.hour, clockTime.min.format("%02d"),clockTime.sec.format("%02d")]);

3)Creating a "view variable" that links to layout.xml and then updating this with the time text:
var view = View.findDrawableById("TimeLabel");
view.setText(timeString);

But all the heavy lifting I did was related to the "countdown until parkrun" part.  Here you can see I call out to another function called "CalcTimeToParkrun".  It was really slow going writing this!

Unlike with other languages like Python there's not a mass of examples an tutorials on the internet or entries on Stack Overflow.  Instead it was a case of using the API reference and trial and error to get things working.  I learnt a lot!

Here's the function:

//Calculate time until parkrun
//Algorithm may be a little clunky.  Refine over time
function CalcTimeToParkrun() {
  //Some constants
  var parkrunDay = 7;     //Parkrun on Saturday.  Could be setting in future
  var parkrunTime = 9;    //Parkrun at 0900.  Could be setting in future
        
  //Need to calculate the next parkrun day at parkrun time and then work out the difference between then and now.  
  var now = Time.now();
  var info = Calendar.info(now, Time.FORMAT_SHORT);
        
  //Format_short means day of week is a number.  1 for Sunday, 2 for Monday etc.
  var dayStr = Lang.format("$1$", [info.day_of_week]);   
  var hourStr = Lang.format("$1$", [info.hour]);
        
  //Might be useful, shows how to format a date
  //var dateStr = Lang.format("$1$ $2$ $3$", [info.day_of_week, info.month, info.day]);
        
  //Have a look at the day of week.  The actual day is a special day as parkrun might either be that day or next week.  
  //Saturday is day 7.
  var dayNum = dayStr.toNumber();   //Turn day to an actual number
  var hourNum = hourStr.toNumber(); //Turn hour into actual number
        
  //What we need to do is calculate how many days to parkrun.  Saturday is the key case, i.e. assessing before or after
  //parkrun time.
  var daysToPR = -1;
  if ((dayNum < parkrunDay) || ((dayNum == parkrunDay) && (hourNum < parkrunTime))){
     daysToPR = 7 - dayNum;
     }
  else {
     daysToPR = 7;
     }
          
  //Create a moment that represents midnight today
  var todayDict = {:day => info.day.toNumber(), :month => info.month.toNumber(), :year => info.year.toNumber()};
  var todayMoment = Calendar.moment(todayDict);
          
  //Create a duration of the number of days until parkrun + hours until parkrun
  var durDict = {:days => daysToPR, :hours => parkrunTime};          
  var myDuration = Calendar.duration(durDict);
          

  //Add the number of days and hours to midnight today to get a moment that represents parkrun start time
  var parkrunMoment = myDuration.add(todayMoment);
         
  //Subtract now from when parkrun is to get a duration until parkrun.  .value turns it into seconds
  var durationTillParkrun = parkrunMoment.subtract(now).value(); 
          
  //So now we have seconds until parkrun. Need to turn into days, hours and mins
  //This seems like hard yards but can't find a better way...
  var daysTillParkrun = durationTillParkrun / 86400;
  var hoursTillParkrun = (durationTillParkrun - (daysTillParkrun * 86400)) / 3600; 
  var minsTillParkrun = (durationTillParkrun - ((daysTillParkrun * 86400)+(hoursTillParkrun * 3600))) / 60;
  var secsTillParkrun = (durationTillParkrun - ((daysTillParkrun * 86400)+(hoursTillParkrun * 3600)+(minsTillParkrun * 60)));
                                        
  //Return 
  return daysTillParkrun.toString() + " days " + hoursTillParkrun.toString() + ":" + minsTillParkrun.toString() + ":" + secsTillParkrun.toString();  
}

The algorithm is pretty simple.  It's as follows:

  • Get a number associated with the day of week.  So Sunday = 1, Monday = 2 etc.
  • Calculate "days until parkrun".  In general this is 7 - Day of week number.  However there's an extra decision to make on parkrun day as to whether it's before or after parkrun (and so mere minutes to go or several days).
  • Calculate a duration* which is from midnight today plus the number of full days until parkrun plus the number of hours to wait on parkrun day.
  • Calculate a moment** which is the actual date and time of parkrun.
  • Calculate the difference between now and the date and time of parkrun.

*A duration is a period of time in Garmin Connect IQ.  So these two lines of code define a duration:
var durDict = {:days => daysToPR, :hours => parkrunTime};          
var myDuration = Calendar.duration(durDict);

So the dictionary defines the number of days and hours for the duration, then the duration is calculated.

**A moment is a moment in time in Garmin Connect IQ.  These two lines of code define a moment:
  var todayDict = {:day => info.day.toNumber(), :month => info.month.toNumber(), :year => info.year.toNumber()};
  var todayMoment = Calendar.moment(todayDict); 

Again the dictionary defines the parameters for the moment and then the moment is created.

You can then do calculations based upon durations and moments:
var parkrunMoment = myDuration.add(todayMoment);

..and so the big reveal, how does it look in the Eclipse simulator?


...hmmm, yes you're right, somewhere between awful and terrible!

Playing with the layout file I changed it to be:

<layout id="WatchFace">
  <label id="TimeLabel" x="center" y="15" font="Gfx.FONT_NUMBER_THAI_HOT" justification="Gfx.TEXT_JUSTIFY_CENTER" color="Gfx.COLOR_WHITE" />
  <label id="TimeToParkrunLabel" x="center" y ="115" font="Gfx.FONT_MEDIUM" justification="Gfx.TEXT_JUSTIFY_CENTER" color="Gfx.COLOR_WHITE" />
  <label id="ParkrunTextLabel" x="center" y ="140" font="Gfx.FONT_MEDIUM" justification="Gfx.TEXT_JUSTIFY_CENTER" color="Gfx.COLOR_WHITE" /> 
  <label id="SloganTextLabel" x="center" y ="175" font="Gfx.FONT_SMALL" justification="Gfx.TEXT_JUSTIFY_CENTER" color="Gfx.COLOR_WHITE" />
</layout>

So all white text and bigger fonts.  The "THAI_HOT" font is a built in Garmin font.  I also played with the simulator settings to specify that a Fenix 3 simulator be used:


...and now it looks a lot better in the simulator:


...and it looks vaguely OK on my wrist after side-loading the application!


So what have I learnt:
  • Real estate is at a premium on a Garmin watch.  Just 218 x 218 pixels to play with!
  • You need to think very carefully as to what to put on the very small screen.
  • I need to explore sleep mode as the watch counts down the seconds for about 10 seconds then stops and just updates once a minute.  Lots of wrist waggling is required to get it to start counting down again.  I know this is to save battery but the default watch faces both have a seconds component so it must be possible to get a continuous countdown.


Saturday, 29 October 2016

Resting Heart Rate and Fitness

Previously I've done plenty of posts on using Fitbit Heart Rate data, Strava data and suchlike to assess my fitness.

Two things I've spotted recently:

  1. My resting heart rate seems to be decreasing, as shown on my Fitbit Charge HR.
  2. I seem to be running consistently faster at parkrun.

Conventional wisdom is that a lower heart rate represents improved fitness.  So to find out whether the two are linked...

The analysis was pretty simple.  First I just scraped monthly average resting heart rate data from my Fitbit app and noted it in Excel (I didn't think I'd need the power or R for this analysis).  This nicely smooths out day-to-day variations in heart rate and shows some decent trends.  Example:


I also scraped all parkrun results from the parkrun website.  I chose to use parkrun for this analysis as it's the same distance run at the same time every week in (almost) the same place.  There are some variables that could affect my time (e.g. if it's muddy underfoot, the odd bit of tourism) but these things should cancel themselves out if you take enough data points and allow trends to be spotted.  An example of the data:

With some Excel jiggery-pokery I managed to get resting heart rate (blue line) and park run times (orange dots) on the same chart.  Here it is:


I like this chart as it tells a real story of the correlation between heart rate and fitness (or low parkrun time).

  • On the left hand side you can see when I first got my Fitbit, my resting heart rate was between 65 and 70 BPM and my parkrun time was ~21 minutes.  
  • I then got injured in summer 2015 and there was a gap when I didn't run at all.  At the end of this my resting heart rate was over 70 BPM so I was relatively unfit.
  • I then made a comeback in Autumn 2015, started running regularly and by Spring 2016 had a sub 60 resting heart rate and was running sub 20 minute parkruns.
  • Then the summer 2016 came and for various reasons (holidays, kids' activities, doing cycling) and my heart rate crept up to nearly 60 BPM and my parkrun time went back to the ~21 minute realm.
  • Then most recently I've done a strong block of focused running training, my heart rate is at 55 BPM (lowest ever recorded) and I'm back to 20 minute and sub 20 minute parkruns.

I love graphs like this!  My view is that running is an "honest" sport, the more you put in the more you get out, and this graph underlines this point.