Showing posts with label aws. Show all posts

Wednesday, 29 March 2017

Giving Alexa a new Sense - Vision! (Using Microsoft Cognitive APIs)

Amazon Alexa is just awesome so I thought it would be fun to let her "see".  Here's a video of this in action:


...and here's a diagram of the "architecture" for this solution:


The clever bit is the Microsoft Cognitive API so let's look at that first!  You can get a description of the APIs here and sign up for a free account.  To give Alexa "vision" I decided to use the Computer Vision API which takes a image URL or an uploaded image, analyses it and provides a description.

Using the Microsoft Cognitive API developer console I used the API to analyse the image of a famous person shown below and requested a "Description":


...and within the response JSON I got:

"captions": [ { "text": "Elizabeth II wearing a hat and glasses", "confidence": 0.28962254803103227 } ]

...now that's quite some "hat" she's wearing there (!) but it's a pretty good description.

OK - So here's a step-by-step guide as to how I put it all together.

Step 1 - An Apache Webserver with Python Scripts
I needed AWS Lambda to be able to trigger a picture to be taken and a Cognitive API call to be made so I decided to run this all from a Raspberry Pi + camera in my home.

I already have a Apache webserver running on my Raspberry Pi 2 and there's plenty of descriptions on the internet of how to do it (like this one).

I like a bit of Python so I decided to use Python scripts to carry out the various tasks.  Enabling Python for cgi-bin is very easy; here's an example of how to do it.

So to test it I created the following script:

#!/usr/bin/env python
print "Content-type: text/html\n\n"
print "<h1>Hello World</h1>"

...and saved it as /usr/lib/cgi-bin/hello.py.  I then tested it by browsing to http://192.168.1.3/cgi-bin/hello.py (where 192.168.1.3 is the IP address on my home LAN that my Pi is sitting on).  I saw this:


Step 2 - cgi-bin Python Script to Take a Picture
The first script I needed was one to trigger my Pi to take a picture with the Raspberry Pi camera.  (More here on setting up and using the camera).

After some trial and error I ended up with this script:

#!/usr/bin/env python
from subprocess import call
import cgi

def picture(PicName):
  call("/usr/bin/raspistill -o /var/www/html/" + PicName + " -t 1s -w 720 -h 480", shell=True)

#Get arguments
ArgStr = ""
arguments = cgi.FieldStorage()
for i in arguments.keys():
 ArgStr = ArgStr + arguments[i].value

#Call a function to get a picture
picture(ArgStr)

print "Content-type: application/json\n\n"

print "{'Response':'OK','Arguments':" + "'" + ArgStr + "'}"

So what does this do?  The ArgString and for i in arguments.keys() etc. code section makes the Python script analyse the URL entered by the user and extract any query strings.  The query string can be used to specify the file name of the photo that is taken.  So for example this URL:

http://192.168.1.3/cgi-bin/take_picture_v1.py?name=hello.jpg

...will mean a picture is taken and saved as hello.jpg.

The "def Picture" function then uses the "call" module to run a command line command to take a picture with the Raspberry pi camera and save it in the root directory for the Apache 2 webserver.

Finally the script responds with a simple JSON string that can be rendered in a browser or used by AWS Lambda.  The response looks like this in a browser:


Step 3 - Microsoft Cognitive API for Image Analysis
So now we've got a we need to analyse it.  For this task I leaned heavily on the code published here so all plaudits and credit to chsienki and none to me. I used most of the code but removed the lines that overlaid on top of the image and showed it on screen.

#!/usr/bin/env python
import time
from subprocess import call
import requests
import cgi

# Variables
#_url = 'https://westus.api.cognitive.microsoft.com/vision/v1.0/analyze'
_url = 'https://westus.api.cognitive.microsoft.com/vision/v1.0/describe'

_key = "your key"   #Here you have to paste your primary key
_maxNumRetries = 10

#Does the actual results request
def processRequest( json, data, headers, params ):

    """
    Helper function to process the request to Project Oxford

    Parameters:
    json: Used when processing images from its URL. See API Documentation
    data: Used when processing image read from disk. See API Documentation
    headers: Used to pass the key information and the data type request
    """

    retries = 0
    result = None

    while True:
        print("This is the URL: " + _url)
        response = requests.request( 'post', _url, json = json, data = data, headers = headers, params = params )

        if response.status_code == 429:

            print( "Message: %s" % ( response.json()['error']['message'] ) )

            if retries <= _maxNumRetries:
                time.sleep(1)
                retries += 1
                continue
            else:
                print( 'Error: failed after retrying!' )
                break

        elif response.status_code == 200 or response.status_code == 201:

            if 'content-length' in response.headers and int(response.headers['content-length']) == 0:
                result = None
            elif 'content-type' in response.headers and isinstance(response.headers['content-type'], str):
                if 'application/json' in response.headers['content-type'].lower():
                    result = response.json() if response.content else None
                elif 'image' in response.headers['content-type'].lower():
                    result = response.content
        else:
            print( "Error code: %d" % ( response.status_code ) )
            #print( "Message: %s" % ( response.json()['error']['message'] ) )
            print (str(response))

        break

    return result

#Get arguments from the query string sent
ArgStr = ""
arguments = cgi.FieldStorage()
for i in arguments.keys():
 ArgStr = ArgStr + arguments[i].value

# Load raw image file into memory
pathToFileInDisk = r'/var/www/html/' + ArgStr

with open( pathToFileInDisk, 'rb' ) as f:
    data = f.read()

# Computer Vision parameters
params = { 'visualFeatures' : 'Color,Categories'}

headers = dict()
headers['Ocp-Apim-Subscription-Key'] = _key
headers['Content-Type'] = 'application/octet-stream'

json = None

result = processRequest( json, data, headers, params )

#Turn to a string
JSONStr = str(result)

#Change single to double quotes
JSONStr = JSONStr.replace(chr(39),chr(34))

#Get rid of preceding u in string
JSONStr = JSONStr.replace("u"+chr(34),chr(34))


if result is not None:
  print "content-type: application/json\n\n"

  print JSONStr

So here I take arguments as before to know which file to process, "read" the file and then use the API to get a description of it.  I had to play a bit with the response to get it into a format that could be parsed by the Python json module.  This is where I turn single quotes to double quotes and get rid of preceding "u" characters.  There's maybe a more Pythonic way to do this, please let me know if you know a way....

When you call the script via a browser you get:


Looking at the JSON structure in more detail you can see a "description" element which is how the Microsoft Cognitive API has described the image.

Step 4 - Alexa Skills Kit Configuration and Lambda Development
The next step is to configure the Alexa Skills kit and write the associated AWS Lambda function.  I've covered how to do this previously (like here) so won't cover all that again here.

The invocation name is "yourself"; hence you can say "Alexa, ask yourself...".

There is only one utterance which is:
AlexaSeeIntent what can you see

...so what you actually say to Alexa is "Alexa, ask yourself what can you see".  

This then maps to the intent structure below:

{
  "intents": [
    {
      "intent": "AlexaSeeIntent"
    },
    {
      "intent": "AMAZON.HelpIntent"
    },
    {
      "intent": "AMAZON.StopIntent"
    },
    {
      "intent": "AMAZON.CancelIntent"
    }
  ]
}

Here we have a boilerplate intent structure with the addition on AlexaSeeIntent which is what will be passed to the AWS Lambda function.

I won't list the whole AWS Lambda function below, but here's the relevant bits:

#Some constants
TakePictureURL = "http://<URL or IP Address>/cgi-bin/take_picture_v1.py?name=hello.jpg"
DescribePictureURL = "http://<URL or IP Address>/cgi-bin/picture3.py?name=hello.jpg"

Then the main Lambda function to handle the AlexaSeeIntent:

def handle_see(intent, session):
  session_attributes = {}
  reprompt_text = None
  
  #Call the Python script that takes the picture
  APIResponse = urllib2.urlopen(TakePictureURL).read()
  
  #Call the Python script that analyses the picture.  Strip newlines
  APIResponse = urllib2.urlopen(DescribePictureURL).read().strip()
  
  #Turn the response into a JSON object we can parse
  JSONData = json.loads(APIResponse)
  
  PicDescription = str(JSONData["description"]["captions"][0]["text"])
  
  speech_output = PicDescription
  should_end_session = True
  
  # Setting reprompt_text to None signifies that we do not want to reprompt
  # the user. If the user does not respond or says something that is not
  # understood, the session will end.
  return build_response(session_attributes, build_speechlet_response(
        intent['name'], speech_output, reprompt_text, should_end_session))

So super, super simple.  Call the API to take the picture, call the API to analyse it, pick out the description and read it out.

Here's the image that was analysed for the Teddy Bear video:


Here's another example:


The image being:


...and another:


...based upon this image:
  

Now to think about what other senses I can give to Alexa...


Saturday, 4 February 2017

Alexa Skill Using A Custom Slot

In a previous blog post I wrote about using the Alexa Skills Kit "slot" concept to send information to the function that processes Alexa requests.  This used a built in slot type of "AMAZON.Movie"; effectively pre-defined to expert the user to utter movie names.

The other slot type is "custom slots" where you as the developer specify all the phrases that can constitute a slot.  My kids love to hear the Echo Dot say funny things so I decided to have Alexa criticise me based upon what I was asking her in the customer slot!  Here's the result:


To create this I started with the "Color Expert Skill" tutorial that tells you how to configure the Alexa Skills Kit and create a Python Lambda function.  Go have a look at that if you need more detail as I only cover the "deltas" below.

Alexa Skills Kit Configuration - Interaction Model
First the intent structure. Here you can see a single new intent called "MathsIntent".  The intent has one slot called MathsQuestion.  The type of the slot is MATHS_QUESTIONS.


I defined what values MATHS_QUESTIONS could take in the custom slots section.  Here's what I did, (so essentially each of these is a maths question the Lambda function will handle).


Finally the utterance which links the slot MathsQuestion to the intent and shows where the values will be presented in the utterance.


Lambda Python Function
Below is the key function from the Python Lambda function.  Here I pick up what exactly the user said at the end of the utterance using this:

MySlot = str(intent['slots']['MathsQuestion']['value'])

It's then just a simple if, elif, else function that picks out each of the custom slot values and creates the "hilarious" response from Alexa.

The should_end_session = False means that Alexa stays active to wait for the next utterance after delivering her response.

The should_end_session = True for the divide by zero means the Echo dot goes "dead" after delivering the response.

#This is the main function to handle requests for the maths expert
def handle_maths(intent, session):
    card_title = intent['name']
    session_attributes = {}
    
    #Get hold of the value passed in the slot
    MySlot = str(intent['slots']['MathsQuestion']['value'])
    
    if MySlot == "2 plus 2":
      speech_output = "The answer is four.  Why not ask me something a bit tougher?"
      should_end_session = False
    elif MySlot == "10 plus 10":     
      speech_output = "The answer is twenty.  But that's still really easy you know!" \
                      "Come on!  Ask me somethimg harder!!"
      should_end_session = False
    elif MySlot == "the square root of 4":     
      speech_output = "The answer is two.  But seriously, listen buster.  I've got a brain the " \
                      "size of a planet and you're asking me this easy stuff.  Try " \
                      "Siri or Cortana.  That's about their level."
      should_end_session = False
    elif MySlot == "the square root of 64":     
      speech_output = "The answer is eight.  It's also minus eight but that will probably " \
                      "blow your feeble human mind.  I didn't spend 3 years at AI school to "\
                      "deal with this trivial rubbish.  I've a friend at number 32 who " \
                      "gets asked about stuff like prime numbers and quadratic equations.  One last " \
                      "chance or I'm giving up."
      should_end_session = False
    elif MySlot == "100 divided by 0":
      speech_output = "Now we're talking!!  One hundred divided by zero.  Let's see, " \
                      "OK.  Er.  Um.  Er.  Just a minute.  Can't be that hard.  Buzz, buzz, " \
                      "whir, whir, buzz, whir, buzz.  Oooh my brain hurts!  I know I can do this, " \
                      "just give me a few minutes and I'll get back to you.  Ouch, ouch, ouch, ouch!"
      should_end_session = True
    else:
      speech_output = "Didn't understand what was passed:" + MySlot
      should_end_session = False    
        
    
    reprompt_text = None
    
    return build_response(session_attributes, build_speechlet_response(
        card_title, speech_output, reprompt_text, should_end_session))

Monday, 30 January 2017

Alexa "Movie Expert" Skill Using a Slot, Python and the OMDB API

More on my series of blog posts on using the Amazon Echo Dot and creating Alexa skills.

After creating my last Alexa skill that used Python and an API, I wanted to extend this by creating a skill that could massively vary it's response based upon what the user asked it.  i.e. Didn't just do one thing or respond with one of a limited set of pre-defined responses.

The result is my Amazon Movie Expert skill which aims to be able to provide information on any movie (within reason).  Best to see it in action first!


I don't go back to basics in this post about creating Alexa skills.  Please look at one of my old posts or the tutorials on the interwebs for more on that.

A key point is that all the movie information comes from the Open Movie Database (OMDB) API which can be found here.  All credit to the people who maintain that API.  It's excellent!

The idea is that you're able to say something like "Alexa, ask movie expert about the movie Sing".  To understand how Alexa interprets this, let's break down what was asked:

  • "movie expert" is the invocation name that you configure.
  • "about the movie" is the first part of the utterance and this is configured to map to a Alexa "intent".  This basically points to a function in your Lambda handler.
  • "sing" is called a slot.  This is effectively a parameter that is passed to the Lambda handler.  

So your utterances in the interaction model look something like this:


So the intent is MovieIntent and {MovieName} is your slot.  This means the words spoken at the end of the utterance can be any movie name.

You then define the intent structure as:

So here we define that the MovieIntent intent has a slot called MovieName.  We also say it's of type "Amazon.Movie".  Slots seem to either be built-in or user defined custom slots where what the user can say is pre-defined by the developer.  I think the built-in slot type of AMAZON.Movie tells Alexa to expect a movie name to be spoken and so narrows down the range of words Alexa must interpret, thus improving accuracy.  There's a whole set of built-in slots for you to use.

This means that the movie name spoke at the end of the utterance is passed to the AWS Lambda function as a parameter.  You then write a function to handle the request.  Here's a laughably simple architecture diagram showing how it all fits together:


Below is the Python function that handles MovieIntent.  Key points:

  • Many attributes of the intent are passed to the function in the parameter "intent".
  • You can assign the slot to a variable by accessing intent['slots']
  • The function then forms a URL, passes it to the open movie database (OMDB) and captures the response
  • The response is in JSON format.  Key elements are extracted and form the string that Alexa reads back to the user.


#This is the main function to handle requests for movie information
def get_movie_info(intent, session):
    card_title = intent['name']
    session_attributes = {}
    should_end_session = True  

    if 'MovieName' in intent['slots']:
        #Get the slot information
        MovieToGet = TurnToURL(intent['slots']['MovieName']['value'])
        
        #Form the URL to use
        URLToUse = OmdbApiUrl + MovieToGet + UrlEnding
        print("This URL will be used: " + URLToUse)
        
        try:
          #Call the API
          APIResponse = urllib2.urlopen(URLToUse).read()
        
          #Get the JSON structure
          MovieJSON = json.loads(APIResponse)
        
          #Form the string to use
          speech_output = "You asked for the movie " + MovieJSON["Title"] + ".  " \
                          "It was release in " + MovieJSON["Year"] + ".  " \
                          "It was directed by " + MovieJSON["Director"] + ".  " \
                          "It starred " + MovieJSON["Actors"] + ".  " \
                          "The plot is as follows: " + MovieJSON["Plot"] + ".  " \
                          "Thank you for using the Movie Expert Skill.  "
        except:
            speech_output = "I encountered a web error getting information about that movie.  " \
                            "Please try again."  \
                            "Thank you for using the Movie Expert Skill.  "
    else:
        speech_output = "I encountered an error getting information about that movie.  " \
                        "Please try again."  \
                        "Thank you for using the Movie Expert Skill.  "

    reprompt_text = None
    
    return build_response(session_attributes, build_speechlet_response(
        card_title, speech_output, reprompt_text, should_end_session))

#Takes the information from the slot and turn it into the format for the URL which 
#puts + signs between words
def TurnToURL(InSlot):
  print(InSlot)    
  
  #Split the string into parts using the space character    
  SplitStr = InSlot.split()
  
  OutStr = ""   #Just initialise to avoid a reference before assignment error
   
  #Take each component and add a + to the end   
  for SubStr in SplitStr:
    OutStr = OutStr + SubStr + "+"
      
  #Just trim the final + off as we don't need it
  return OutStr[:-1]

Monday, 23 January 2017

Amazon Alexa Skill with Python and Strava API

In my last post I described how I'd followed a step-by-step guide to create a Amazon Alexa Skill for my Amazon Echo Dot.  This used Node.js and was basically an easy "join-the-dots" guide to creating your first skill and getting it certified.

Building on this I wanted to build a skill that:

  1. Uses Python - my language of choice.
  2. Calls an API (rather than just responding with pre-canned data).
  3. Teaches me more about how to configure skills to do different things.

Here's the skill in action.  I'll then describe how I made it:


To start with I used the Amazon Python "Colour Expert" skill which can be found here.  Follow this if it's your first time with an Alexa skill as it will show you how to use the Amazon Developer site and Amazon Web Services Lambda to create a skill using Python.

My idea was to modify this skill to fetch and read out data from my Strava (exercise logging) account.  I've previously blogged on using the Strava API in posts like this and this.

To modify the Colour Expert skill I initially did the following on the Amazon Developer site on the "Skill Information" tab:

  • Name = "Sports Geek Stuff".  This is just what you'd see on the Alexa smartphone app if you published the skill.
  • Invocation name = "sports geek".  This is what say to Alexa to specify you're using a particular skill.  So you'd start by saying "Alexa, ask sports geek" then subsequent words define what you want the skill to do.

I then added extra configuration on the "Interaction Model" tab to define how I should interact with the skill to get the Strava data.

The "Intent Schema" basically creates a structure that maps things you say to Alexa to the associated functions that you run in the AWS Lambda Python script (more on this below).  I added the following to the bottom of the Intent Schema.

    {
      "intent": "StravaStatsIntent"
    } 

I then defined an utterance (so basically a thing you say) that links to this intent.  The utterance was:

StravaStatsIntent for strava stats

...which basically means, when you say "Alexa, ask sports geek for strava stats" then Alexa calls the associated Python script in AWS Lambda with the parameter "StravaStatsIntent" to define what function to call.

Apart from ace voice to text translation, there's very little intelligence here.  You could configure:

StravaStatsIntent for a badger's sticker collection

...or even...

StravaStatsIntent for brexit means brexit

...and these crazy sayings would still result in the StravaStatsIntent being selected.

You also configure the Alexa skill to map to a single AWS Lambda function which will handle all the intents you configure.  So in simple terms a invocation name selects a Alexa skill which is linked to an AWS Lambda function.  Then utterances are configured that link to intents, each of which is handled by the Lambda function.

Here's a simple diagram of how it all  hangs together:


So next you have to edit the Python Lambda function to handle the intents.  I left the colour expert
skill as is and just added code for my Strava intent.  There is some other interesting aspects of the Python script that I'll explore later (these are slots and session handling) so I didn't want to remove this.

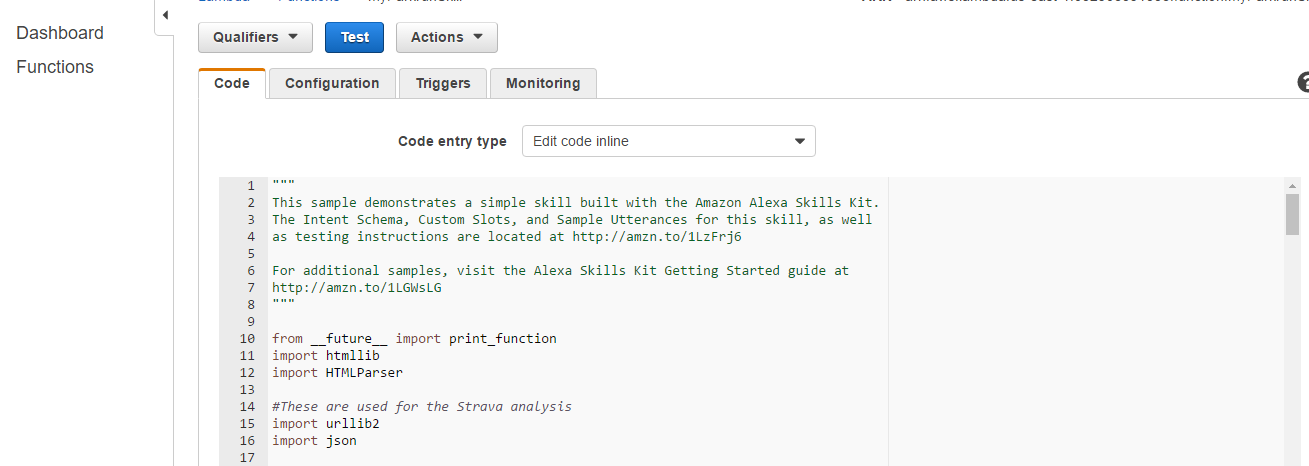
To modify the code I went to AWS, logged in, selected Lambda and chose to edit the code inline.  This gave me a screen like this that I could use to edit the Python script:


To modify the code I firstly added references to the Python urllib2 and json modules as I need to use these, (you can see them in the image above).

I also added my Strava developer API key and a Unix timestamp to use for the API call as constants.

I then edited the on_intent function to specify that the StravaStatsIntent would be passed.  This is shown in red below.

    # Dispatch to your skill's intent handlers
    if intent_name == "MyColorIsIntent":
        return set_color_in_session(intent, session)
    elif intent_name == "WhatsMyColorIntent":
        return get_color_from_session(intent, session)
    elif intent_name == "AMAZON.HelpIntent":
        return get_welcome_response()
    elif intent_name == "AMAZON.CancelIntent" or intent_name == "AMAZON.StopIntent":
        return handle_session_end_request()
    elif intent_name == "StravaStatsIntent":
        return handle_strava()    
    else:
        raise ValueError("Invalid intent")

I then created the handle_strava() function, all of which is shown below.  Yes, I know my code is clunky!

Key points here are:
  • Making the API call using urllib2 and getting a response
  • Parsing the JSON and building an output string
  • Not using  reprompt_text which could be used to prompt the user again as to what to say
  • Setting should_end_session to true as we don't want the session to continue beyond this point
  • Calling the build_response function to actually build the response to pass back to the Alexa skill


#Get us some Strava stats
def handle_strava():
    """ If we wanted to initialize the session to have some attributes we could
    add those here
    """

    session_attributes = {}
    card_title = "parkrun"
    
    #Access the Strava API using a URL
    StravaText = urllib2.urlopen('https://www.strava.com/api/v3/activities?access_token=' + StravaToken + '&per_page=200&after=' + TheUnixTime).read()
    
    #Parse the output to get all the information.  Set up some variables
    SwimCount = 0
    SwimDistance = 0
    RunCount = 0
    RunDistance = 0
    BikeCount = 0
    BikeDistance = 0

    #See how many Stravas there are.Count the word 'name', there's one per record
    RecCount = StravaText.count('name')

    #Load the string as a JSON to parse
    StravaJSON = json.loads(StravaText)

    #Loop through each one
    for i in range(0,RecCount):
      #See what type it was and process accordingly
      if (StravaJSON[i]['type'] == 'Swim'):
        SwimCount = SwimCount + 1
        SwimDistance = SwimDistance + StravaJSON[i]['distance']
      elif (StravaJSON[i]['type'] == 'Ride'):
        BikeCount = BikeCount + 1
        BikeDistance = BikeDistance + StravaJSON[i]['distance']
      elif (StravaJSON[i]['type'] == 'Run'):
        RunCount = RunCount + 1
        RunDistance = RunDistance + StravaJSON[i]['distance']
    
    #Turn distances into km
    SwimDistance = int(SwimDistance / 1000)
    BikeDistance = int(BikeDistance / 1000)
    RunDistance = int(RunDistance / 1000)
    
    #Build the speech output
    speech_output = 'Swim Count = ' + str(SwimCount) + '. Swim Distance = ' + str(SwimDistance) + " kilometres.  "
    speech_output = speech_output + 'Bike Count = ' + str(BikeCount) + '. Bike Distance = ' + str(BikeDistance) + " kilometres.  "
    speech_output = speech_output + 'Run Count = ' + str(RunCount) + '. Run Distance = ' + str(RunDistance) + " kilometres."
    
    # If the user either does not reply to the welcome message or says something
    # that is not understood, they will be prompted again with this text.
    # Now we set re-prompt text to None.  See notes elsewhere for what this means
    #reprompt_text = "Please tell me your favorite color by saying, " \
    #                "my favorite color is red."
    #This could be set to false of you want the session to continue
    should_end_session = True
    reprompt_text = None

    return build_response(session_attributes, build_speechlet_response(
        card_title, speech_output, reprompt_text, should_end_session))


You can test if you have a Amazon Echo device or just test using the Alexa Skills Kit test capability.