Thursday, 21 November 2013

Raspberry Pi Powered Lego Car 2.0

Want to take a Raspberry Pi, some Lego motors and a Wii Controller and build a remote control car?  Well read on as this page will tell you how to do it!!

Last year my daughters and I built a Lego car that, with the addition of a Raspberry Pi, some motors and a motor controller we could control using an Android mobile phone.

Having bought a Bluetooth dongle for another project (hopefully more about that in a later post), a random meander around the internet showed me I could link the Raspberry Pi to a Wii remote control (Wiimote) and do "stuff".  Hence I had the idea to control the Lego car with a Wii remote plus the Wii steering wheel you buy for things like Mario Kart Wii.

Here's a video of the final car.  Read on below to see how I made it.


The basic building blocks:
-Lego motors + Raspberry Pi + Motor controller.  Lots of detail on the post I wrote last year.
-A Bluetooth dongle, bought from modmypi.
-Details on how to integrate a Wiimote to a Linux machine using cwiid.  There's a great example of using it on the Cambridge University website.

Feedback I had from my daughters last year was that the old school Lego car we used was too slow (because it was heavy) and too difficult to steer.  Hence I decided to build a new, much smaller and lighter car with a different steering mechanism.

From a steering perspective, what was wrong last year was that the rack and pinion steering was simply too cumbersome.  To turn right you steered right.  Then to straighten up you had to steer left just enough to straighten up the wheels.  At this time you generally were not moving the car forward or back because it was too confusing.  All-in-all it was all too finicky so I decide to use a tank track style steering mechanism because this meant that you could send a simple "steer-right" or "steer left" command and it would only turn for the period you issue the command.

Using cwiid is very easy:
-Install on a Pi using the command sudo apt-get install python-cwiid.
-Import the library with import cwiid and create an object to access Wiimote actions using wm = cwiid.Wiimote() 
-Report button presses with wm.rpt_mode = cwiid.RPT_BTN and check the actual state with statements like if (wm.state['buttons'] & cwiid.BTN_1):
-Report the accelerometer state with wm.rpt_mode =  cwiid.RPT_ACC and get the actual state with  print(wm.state['acc'])

The accelerometer state is a tuple with 3 values.  When holding the Wiimote in the Wii steering wheel, it's the second value that varies if you steer left and right.  So doing:

wm.rpt_mode = cwiid.RPT_ACC
AccVar =  wm.state['acc']
...means that you can assess the left write position of the wheel by assessing AccVar[1].  With he Wiimote horizontal the value was 120.  It increased as I "steered" left and decreased as I "steered" right.  Hence I decided to set the steer left threshold as > 130 and the steer right threshold as < 110 which was roughly equal to the 10 o clock and 2 o clock positions.

So after playing with cwiid, button pressing and accelerometer reading I set about building the car. Here's a few more images:


I can't publish a full "how-to-build" guide as I made it up as I went along!  However here's a few highlights:
-Built on two levels; motors, tracks + wheels and Pi battery on the bottom layer, the Pi, motor controller board and motor battery on the top level.
-Two motors mounted at 90 degrees to the direction that the tank track turns.  I used a pair of cogs that allow motion to be transferred through 90 degrees.  These connected to a cog of equal size that drove the tank track.  I experimented with software PWM but found that with this gearing and the weight of the car I could simple switch the motors off and on and the car would move.  (I've left some of the PWM in the full code listing below so use it if you wish).
-Some tank tracks mounted on large cogs.  The tank tracks came from a Lego pneumatic excavator that I owned as a child. I did try various wheel arrangements but found it would only work with the tracks.
-On the top level, a careful arrangement of Raspberry Pi, motor controller board and motor battery.  For the battery I used an 7.2V, 5000mAh battery from an old camcorder.  This gives much more "play time" than the old PP3 re-chargeable I previously used.
-Various odds and ends to keep everything in place and stop the wires from falling out or snagging in the tracks.

Control of the tracks via the motors was very easy.  There is basically 5 ways to drive the motors:
-Left hand motor (LHM) clockwise, right hand motor (RHM) antiwise = Go forward.
-LHM anticlockwise, RHM clockwise = Go backward.
-LHM and RHM clockwise = Turn left.
-LHM and RHM anti-clockwise = Turn right.
-Motors off, stopped (!).

The code is basically a state machine that assesses which buttons are pressed and how the Wiimote is tilted, (e.g. button 1 pressed and Wiimote value between 110 and 120 means the state is ForwardNoSteer).  If the state does not change then no action is taken, if the state changes then the motors are command to move appropriately.

Full code listing below.  Next steps: do something with the Raspberry Pi camera and control the car with Scratch!


#Mostly used code from these two sites
#https://code.google.com/p/raspberry-gpio-python/wiki/PWM
#http://www.cl.cam.ac.uk/projects/raspberrypi/tutorials/robot/wiimote/

import cwiid 
import time
import os
import RPi.GPIO as GPIO   #The GPIO module

#A routine to control the pins
def ControlThePins(TheState):
  print "Controlling them pins:c" + TheState 
  #First just turn them all off - then we work out what to do
  GPIO.output(11,False)
  GPIO.output(13,False)
  GPIO.output(19,False)
  GPIO.output(21,False)

  #Just work through the different motor states, setting the pins accordingly
  if TheState == GoForward:
    GPIO.output(11,True)
    GPIO.output(13,False)
    GPIO.output(19,True)
    GPIO.output(21,False)
  elif TheState == GoBackward:
    GPIO.output(11,False)
    GPIO.output(13,True)
    GPIO.output(19,False)
    GPIO.output(21,True)
  elif TheState == SteerLeft:
    GPIO.output(11,True)
    GPIO.output(13,False)
    GPIO.output(19,False)
    GPIO.output(21,True)
  elif TheState == SteerRight:
    GPIO.output(11,False)
    GPIO.output(13,True)
    GPIO.output(19,True)
    GPIO.output(21,False)
  elif TheState == StopIt:
    #Do nothing as we stopped all pins first thing
    pass

  #Just return
  return

#This is a PWM routine.  
def ControlMyPins(Num11,Num13,Num19,Num21):
  print "PWM Control of pins using " + Num11 + "-" + Num13 + "-" + Num19 + "-" + Num21

  if Num11 == "1":
    #Speed the motor up
    for dc in range(0, 101, 5):
      PIN11.ChangeDutyCycle(dc)
      time.sleep(0.03)
  else:
      #Stop PWM
      PIN11.start(0)  

  if Num13 == "1":
    #Speed the motor up
    for dc in range(0, 101, 5):
      PIN13.ChangeDutyCycle(dc)
      time.sleep(0.03)
  else:
    #Stop PWM
    PIN13.start(0)  

  #And return
  return

#######################
#Main part of the code#
#######################

#Set up the GPIO pins
#Get rid of warnings
GPIO.setwarnings(False)

#Set the GPIO mode
GPIO.setmode(GPIO.BOARD)

#Set the pins to be outputs
GPIO.setup(11,GPIO.OUT)
GPIO.setup(13,GPIO.OUT)
GPIO.setup(19,GPIO.OUT)
GPIO.setup(21,GPIO.OUT)

#Set the pins to be PWM pins 
#PIN11 = GPIO.PWM(11, 100)  # channel=11 frequency=50Hz
#PIN11.start(0)
#PIN13 = GPIO.PWM(13, 100)
#PIN13.start(0)
#PIN19 = GPIO.PWM(19, 100)
#PIN19.start(0)
#PIN21 = GPIO.PWM(21, 100)
#PIN21.start(0)

#Now we start defining some constants to use.  We have three concepts:
#1)The motor command.  Stating Forward, Backward, Left, Right, Stop
#2)The sensor position and whether a button is pressed
#3)The system state, e.g. Sys1Level, Sys1Right etc
#We determine sensor position, see if the system state has changed and if so send a new motor command

#Motor commands
GoForward = "Forward"
GoBackward = "Backward"
SteerRight = "Right"
SteerLeft = "Left"
StopIt = "Stop"

#Constants for the system state and then an assignment
ForwardNoSteer = "FNS"
ForwardSteerLeft = "FSL"
ForwardSteerRight = "FSR"
BackwardNoSteer = "BNS"
BackwardSteerLeft = "BSL"
BackwardSteerRight = "BSR"
SystemStopped = "SS"
SystemState = SystemStopped

#Now left and right
#You get a 3 tuple and the middle value is what you need.
#Horizontal is 120.  Going right decreases the value so < 110 is steer right.  Going left increases the value so > 130 is steer left
SteerRightValue = 110
SteerLeftValue = 130

#Make the Bluetooth dongle discoverable
os.system("sudo hciconfig hci0 piscan")

#connecting to the Wiimote. This allows several attempts 
# as first few often fail. 
print 'Press 1+2 on your Wiimote now...' 

wm = None 
i=2 
while not wm: 
  try: 
    wm=cwiid.Wiimote() 
  except RuntimeError: 
    if (i>10): 
      print "Giving up connecting"
      quit() 
      break 
    print "Error opening wiimote connection" 
    print "attempt " + str(i) 
    i +=1 
    #Pause for a bit
    time.sleep(0.5)

#Got here, tell the user
print "Success - we have connected!"

#set Wiimote to report button presses and accelerometer state 
wm.rpt_mode = cwiid.RPT_BTN | cwiid.RPT_ACC 

#Wait a bit
time.sleep(1)

#Do a celebratory LED KITT style sweep
LoopVar = 0
while LoopVar < 3: 
  #turn on leds to show connected 
  wm.led = 1
  time.sleep(0.1)
  wm.led = 2
  time.sleep(0.1)
  wm.led = 4
  time.sleep(0.1)
  wm.led = 8
  time.sleep(0.1)
  #Set up for next loop 
  LoopVar +=1  

#Turn off the LEDs now
wm.led = 0

#Wait a bit
time.sleep(0.5)

#Count in binary on the LEDs
#for i in range(16):
  #wm.led = i
  #time.sleep(0.5)

#Do a rumble
wm.rumble = True
time.sleep(0.5)
wm.rumble = False

#Now start checking for button presses
print "Ready to receive button presses and accelerometer input"

#Loop for ever detecting

try:
  while True:
    #Set up a button object to check
    buttons = wm.state['buttons']

    #We assess whether the Wiimote is level, left or right by assessing the accelerometer
    AccVar = wm.state['acc']
    
    #Check all the different possible states of button, accelerometer and system state.  First button 1 pressed and steering left
    if (buttons & cwiid.BTN_1) and (int(AccVar[1]) > SteerLeftValue) and (SystemState != ForwardSteerLeft):
      #Tell the user
      print "Forward Steer Left"

      #Change the state to be this now
      SystemState = ForwardSteerLeft
        
      #Set the motor state
      ControlThePins(SteerLeft)
    elif (buttons & cwiid.BTN_1) and (int(AccVar[1]) < SteerRightValue) and (SystemState != ForwardSteerRight):   #Button 1 pressed and steering right
      #Tell the user
      print "Forward Steer Right"

      #Change the state to be this now
      SystemState = ForwardSteerRight

      #Set the motor state
      ControlThePins(SteerRight)
    elif (buttons & cwiid.BTN_1) and ((int(AccVar[1]) >= SteerRightValue) and (int(AccVar[1]) <= SteerLeftValue)) and (SystemState != ForwardNoSteer):   #Button 1 pressed.  Acclerometer in the middle  
      #Tell the user
      print "Go forward"

      #Change the state to be this now
      SystemState = ForwardNoSteer

      #Set the motor state
      ControlThePins(GoForward)
    elif (buttons & cwiid.BTN_2) and (int(AccVar[1]) > SteerLeftValue) and (SystemState != BackwardSteerLeft):    #Backward and steering left
      #Tell the user
      print "Backward Steer Left"

      #Change the state to be this now
      SystemState = BackwardSteerLeft

      #Set the motor state
      ControlThePins(SteerLeft)
    elif (buttons & cwiid.BTN_2) and (int(AccVar[1]) < SteerRightValue) and (SystemState != BackwardSteerRight):   #Button 2 pressed and steering right
      #Tell the user
      print "Backward Steer Right"

      #Change the state to be this now
      SystemState = BackwardSteerRight

      #Set the motor state
      ControlThePins(SteerRight)
    elif (buttons & cwiid.BTN_2) and ((int(AccVar[1]) >= SteerRightValue) and (int(AccVar[1]) <= SteerLeftValue)) and (SystemState != BackwardNoSteer):   #Button 2 pressed.  Acclerometer in the middle  
      #Tell the user
      print "Go backward"

      #Change the state to be this now
      SystemState = BackwardNoSteer

      #Set the motor state
      ControlThePins(GoBackward)
    #No button pressed so we reach this else statement, see if it's because of a change of state  
    elif (not(buttons & cwiid.BTN_1)) and (not(buttons & cwiid.BTN_2)) and (SystemState != SystemStopped):  
      #Tell the user
      print "No buttons pressed"
         
      #Change the state to be this now
      SystemState = SystemStopped
          
      #Change the motor state to be off
      ControlThePins(StopIt)
      
    #Chill for a bit
    time.sleep(0.1)
except KeyboardInterrupt:
    pass

print "Good night"

#End of the code - turn off pins then exit
ControlThePins(StopIt)  


Sunday, 27 October 2013

Raspberry Pi Camera - Injury Diagnosis

When I'm not doing Dad Geekery, one of my other hobbies is keeping fit by running, cycling and swimming.  For a while I've been trying to think of a way to combine the two.  The arrival of a Raspberry Pi camera module over the summer gave me an idea....

Over the past couple of years I've been suffering from frequent left calf muscle injuries.  Basically when I run I get a sore left calf and occasionally I get a minor muscle tear.  Earlier in the year I bit the bullet and went to see a physio about it.  The advice from the physio was:

  • I needed to rest it to let it heal, and
  • The reason I get calf injuries is because my left leg is weaker then my right leg, (in fact the whole of the left side of my body is a relative weakling).

So the recommendation from the physio was to rest and then also to do a lot of left side strengthening, (e.g. knee bends, hopping up and down steps, doing interesting things with elastic resistance bands).

The "weak left side" diagnosis rings true through some other observations:
  • When I swim breast stroke I'm told my left leg kicks much less strongly than my right leg,
  • When I cycle and get tired, my left knee drops inwards and knocks against the cross bar,
  • When I went to buy new running trainers from a running specialist they did video analysis as I ran on a treadmill.  This showed my left foot landing and then rolling inwards too much which puts stress on my knee and calf muscle.

So when two things happened at once in a week during August 2013 (calf going ping again and the arrival of my RasPi camera module) I decided to do some scientific analysis.  The plan was to use my RasPi camera module to analyse me doing some physical jerks, do a period of strengthening and then repeat the analysis.

So first I needed to have a decent setup for the camera module. Using the magic of Lego I built this rig:


So the Lego keeps it all stable and with a hinged Lego piece (hidden by the ribbon cable on the image) allowing me to adjust the camera position up and down.

I then set this up outside on my patio so as to be able to record video of myself doing various exercises.  Here's the setup, (essential use of my old Lego case to keep it off the ground):


Using this command I could record a short video:
  
raspivid -t 10000 -o video1.h264

I could then turn this into an MP4 using this command:

MP4Box -fps 30 -add video1.h264 video1.mp4

(I had to install the MP4Box application to do this).

Here's a video of me jumping on the spot:


Now I think just by watching the video you can see my left foot being placed out wider than my right foot and my knee dropping outwards.

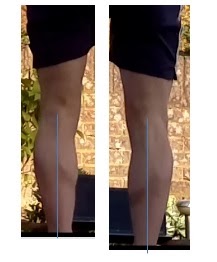
Transferring the video to a PC and using Quicktime, I could advance the video frame by frame.  I select the frame where my foot was planted and just about to spring up, so to my mind the point where there is maximum stress on my leg.  I did a print screen, pasted the image to Word and then drew straight lines from the middle of my knee downwards.  Here's the image I got:


So the line on my right leg goes down pretty straight from the middle of my knee to my heel.  On my left leg my knee is really turned outwards. More evidence of my dodgy left side.

Here's the equivalent for me running on the spot.  First the video:


...and then a split screen image:


Same again, this time for me skipping.  Video first:


...the the split screen image:


So overall, some excellent evidence of my weakling left side and how it impacts various exercises.

Over the course of August I embarked on a series of strengthening exercises to build up my left side.  I did a bit more strengthening in September / early October but at that time was more focused on training for a 10K run and then a multi-stage bike ride I was doing in middle of October.  The 10K race then the bike ride passed with no more injury and no evidence of my right knee knocking the cross bar.  

I ran this morning and, whilst I didn't get injured again I felt a bit of a niggle in my left calf.  It was cold day, the route was hilly and I'm a little paranoid about it; all things that might have contributed to the niggle.

So I decided to re do the analysis.  First the jumping:


...with the image:

The running video:

<Insert this when YouTube stops being so dumb>

...with the image:


...and finally the skipping video:


...with the skipping image:

Now I did two things differently in October when compared to August.  Firstly I had the camera aligned differently so you can't see my feet and secondly I only took 5s of video footage. A bit daft that!

My observation is that things are straighter now than they were back in August.  The straight line from my left knee runs down the middle of my calf.

So my strengthening exercises are working and I have tangible proof of this.  Thanks Raspberry Pi camera board!  However I'm not 100% sure everything is super straight so I will come back to this in a couple of months and re-run the exercise.


Friday, 26 April 2013

Blue Raspberry Pi

There was much excitement in the Geek household yesterday when my limited edition Blue Raspberry Pi arrived.


The Raspberry Pi Foundation produced 1000 of these to celebrate the first year of production of the Raspberry Pi.

RS ran a competition on Twitter, the winning prize being a Blue Pi.  To enter the competition, all you had to do was Tweet @RSElectronics with the hashtag #bluepi and a description of what you'd do with a blue Pi.  Here was my entry:

So easy to enter, I didn't even have to enclose a stamped, addressed envelope*.  I only went and won!  I was chuffed to bits.

The observant Geek dad blog fan will observe that I've already made a Scratch controlled Raspberry Pi disco.  The reality is that, following the mantra that "a pessimist is never disappointed",  I didn't think I'd be lucky enough to win a blue Pi. Hence I want out and bought another Pi to use, (my first Pi being busy running my environment monitor). But I did!!

* Showing my age.  

Sunday, 7 April 2013

Raspberry Pi Scratch GPIO Disco Lights Game

Eben Uptons's Pycon keynote speech reminded me that the Raspberry Pi project was all about getting kids in to coding.  To date, I'd got the kids interested in the Pi through things like the Pi controlled Lego car and they love Minecraft, but I couldn't say that we'd done some proper coding.

The answer was to do more with Scratch and we tinkered around with it and (my six year old in particular - she calls Scratch "Kitty-Cat") enjoyed this.  We got the sprite to move around, react to keyboard presses and say stuff.  Interesting to them but not super-exciting.

I decided we'd need to do some stuff with the GPIO to make it more interesting.  This brilliant blog posting from SimpleSi explains how to do it.  Full marks to him for doing this, it's excellent.

My first try was to build a Lego disco; it's shown on the picture below.  On the picture you can see:
-The disco lights (bottom middle)
-The motors for the glitter balls
-The funky dance floor


...a view of the wiring and soldering, (so it's simply some jumper wires from the GPIO onto a bread-board, through some resistors and then to the LEDs:


Using Scratch GPIO control we could:
-Set up different light sequences.
-Turn the glitter ball motors on and off.
-Compose some music.

Here's an example of a light sequence and music, (not sure how to export Scratch code other than this!!):


...and two light sequences plus a method to piece multiple sequences together.  The "when 3 key pressed" block is almost like a main procedure that calls two sub-routines.  I like it!


The kids liked this but didn't find it super-exciting.  There's only so many ways you piece together light sequences and making the music is a little laborious.  For some reason, making the LEDs flash left to right then right to left like KITT / a Cylon didn't excite them!

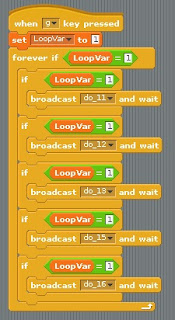
So the next plan was to create a game where the LEDs flashed in a sequence and you win by pressing the space bar when the central LED is lit.  Here's the code, segment by segment.  First, pressing G gets you in to the loop shown below:


So this sets a LoopVar with the value 1 then goes in to a loop, sending out a set of broadcast messages and testing LoopVar to see if the loop and the broadcast messages should continue.

The code segments that receive the broadcast messages are shown below:


So the code receives the broadcasts, sets a variable that can be checked to see if the LED is lit, lights the LED, pauses then turns the LED off.

The final code segment handles detecting when the space bar is pressed:


So when the space bar is pressed:
-LoopVar is set to 0 to come out of the "G" loop, (the "if LoopVar = 1" checks in the "G" loop means we don't light the LEDs for the remainder of the loop)
-We check which LED is lit.
-If the centre LED is lit (GPIO output 13) then you get a you've "won message", the LED flashes and a happy sound is played.
-If other LEDs are lit then you get a "you've lost" message and the Kitty Cat meows.

The kids enjoyed playing the game and tinkering with the code.  We changed timer variables, changed the words that Kitty Cat says, changed the sounds made when winning and losing and changed loop variables, (i.e. play sounds more/less when you win).

Subsequent modifications we made:
-Allow the time the light is on to be modified by changing a single variable, (rather than modifying 5 code blocks).
-Allow the time the light is lit to be gradually decreased, making the game harder.
-Added a "Points" variables that increases as the lights flash faster, (i.e. more points if you win when the lights are flashing fast).

My eldest said it was "Epic and fun at the same time" and my youngest said it was "Awesome".  That will do for me!

(They subsequently said "can we play Minecraft" so there's still some work to do...)

Wednesday, 20 March 2013

Raspberry Pi - Fridge Monitor

My fridge-freezer has this control unit on the front of it:


As a geek I'm not prepared to believe this display so I thought I'd have a closer look at the environment in the fridge using the AirPi environment monitor I previously built.

Breaking out the battery pack I previously use for our Pi powered Lego car I was able to get the whole unit to run in my fridge.  As you can see from the image below, the Pi looks at home with it's distant cousins!


The WiFi worked OK through my fridge door so I was able to upload the measurements to COSM.  Here's how the temperature changed over the 4 hours period I monitored:
The chart isn't great, each vertical column represents 30 minutes and and the Y-axis scale is a tad screwy.  You can see that I put the monitor in the fridge at just before 1800 and took at out at 2200.  It actually took about 50 minutes to get down to the temperature of the fridge; I assume that this is because of the residual heat in the temperature monitor and it's surroundings.  You can then see the temperature go through about 3 cycles with the minimum point being ~3.8C and the maximum point being ~5.6C.  So I would say it spends more time above 4C than below it...

This chart shows the light level:

The light level needs calibration but you can see relative light levels quite easily.  I only take samples every minute so I may have missed instances when I opened the fridge that evening.  However there is a definite peak at about 1830 so caught an instance then.

This chart shows humidity:

The fridge boasts some form of humidity control, (some form of fan kicks in when you close the door).  To me there's not too much of a pattern, perhaps some form of cycle going on in the mid part of the evening.

This chart shows barometric pressure:


The pressure just grows throughout the evening.  I didn't have a pressure sensor outside so I don't know if this is what was happening in the general environment.

All in all,very interesting; might have to do it again some time.  I was considering doing the freezer as well but was worried what would happen if the kit got frosty..  


Tuesday, 12 March 2013

Sky IP Speech Control with Android

Just after Christmas I asked my eldest daughter what geekery she wanted me to do next.  She suggested being able to control the TV by speaking to it.  Sounded like a challenge to me....

Overall, a pretty easy problem to solve.  If you've got about £1,500 to spare you can buy a Samsung Smart TV that comes with voice (and gesture control).  That's not pocket money prices and simply buying something that does the whole job is not the Geek Dad way.

A colleague told me about how he can control his Sky box with his iPad over his home WiFi network.  Sounds like an opportunity.   My old Sky box gave up the ghost later last year and was replaced with a shiny new black Sky+ HD box.  This has an ethernet port on the back of it and, by purchasing a Sky Wireless Controller I could use my wife's iPad as a remote control and also use the Sky On Demand service.

A quick Google search for "sky ipad protocol" led me to this blog:
http://www.gladdy.co.uk/blog/2012/08/18/sky-dnla-upnp-the-ipad-app-and-the-ip-control-protocol/

This chap has pretty much done all the hard work to decode the DLNA/ UPnP protocol used by the Sky box and has published a full code listing.  One thing he describes is how the Sky box constantly broadcasts SSDP messages to your LAN so I set up Wireshark to have a look at this. Here's an example:


So this seems to show the Sky box saying, "I am here, I have a file called description37.xml that describes what I can do".  A quick Python script to download description37.xml gets you an XML file that points to several other resources like "player_avt.xml", "player_cm.xml", "player_rc.xml" that seem to describe some SOAP services that the Sky box supports.

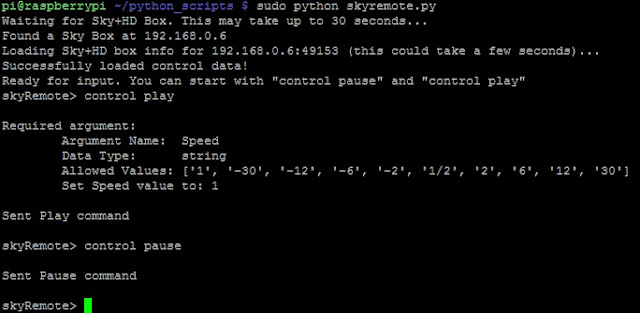
Rather than re-inventing the wheel I decided to use the brilliant code that Liam Gladdy published.  The Python script didn't work on my PC Python installation (missing packages) but did work on my Raspberry Pi.   Here's a screenshot of it in action:


So the script listens for the SSDP broadcasts, identifies the IP address for the Sky box and allows you to send SOAP commands to the Sky box.  It works a treat and it's a great way to annoy my wife, (keeper of the Sky remote).

The one thing the script didn't seem to let me do was to change channel on the Sky box, (essential to meet my daughter's challenge).  Another quick Google led me to this forum topic:
http://www.gossamer-threads.com/lists/mythtv/users/525915

These chaps have worked out that the "SetAVTransportURI" operation is used to change the channel on the Sky box and they've published some Python code showing how to do it. So using this, and reverse engineering the code for pause, play and stop from the Liam Gladdy code I was able to write a Python script with functions for pause, play, stop and change channel.

Here's a snippet, a function that sends a pause SOAP command:

# Do a command to pause the playback
#
def PauseSkyBox():
    XML="""<?xml version="1.0" encoding="utf-8"?>
<s:Envelope s:encodingStyle="http://schemas.xmlsoap.org/soap/encoding/" xmlns:s="http://schemas.xmlsoap.org/soap/envelope/">
<s:Body>
<u:Pause xmlns:u="urn:schemas-nds-com:service:SkyPlay:2">
<InstanceID>0</InstanceID>
</u:Pause>
</s:Body>
</s:Envelope>"""

    headers=  { "Content-Length": "%d" % len(XML), "SOAPACTION": "\"urn:schemas-nds-com:service:SkyPlay:2#Pause\"", "Content-Type": "text/xml; char-set=utf-8"  }

    try:
conn = httplib.HTTPConnection("%s:49153" % skyAddress)
conn.request("POST",  "/SkyPlay2", "",  headers)
conn.send(XML)
response = conn.getresponse().read()
        print response
        conn.close()

dom = parseString(response)

    except Exception as inst:
sys.exit("Error doing a Pause command from %s: %s" % (skyAddress, inst))


The function simply creates the XML command as a string, creates a HTTP header, sends the command and awaits a response.

Using SL4A and Android speech recognition (see here for a previous example) it was easy to write a Python script to recognise speech commands and call functions to send a SOAP command to the Sky box. The code implements pause, play, stop, fast-forward (play with a different speed), rewind (play with negative speed) and changing channels.  Observations:
  • The Android speech recognition algorithm doesn't work for me with the word "pause".  It translates to "polls" or "horse".  Must be my geeky accent.   I use the word "still" instead.
  • I'm not 100% happy with the long "elif"  statement for each of the fast forward and rewind translations.  With a bit of thought I could do this better I'm sure.
  • The code relies upon a text file that contains a mapping from a decimal channel number to a hex equivalent and a channel name.  Download your own from one of the postings on the http://www.gossamer-threads.com/lists/mythtv/users/525915 forum.  I found my channel mappings to be different to those in the file so you'll have to play with this a bit.  I put this in the root directory of my SD card on my handset and then used the chdir ('/mnt/sdcard') command.
Here's a full code listing:


# Sky remote controller
# References http://www.gladdy.co.uk/blog/2012/08/18/sky-dnla-upnp-the-ipad-app-and-the-ip-control-protocol/
# http://www.gossamer-threads.com/lists/mythtv/users/525915

#!/usr/bin/python

#Import statements 
import  httplib,  sys, os
from  xml.dom.minidom import parseString
import android
from os import chdir

#Constants
skyAddress = "192.168.0.6"        # IP Address of Sky+HD Box
skyChannelsFile = "sky_channel_guide.txt" # Location of Channel Data

# Parse through tab delmited channel listing and return HEX Channel No

def findSkyChannel(channelFind):
    
    try:
channelsFile = open (skyChannelsFile, "r")
for line in channelsFile:
   rawdata = line.split('\t')
   if rawdata[0] == channelFind:
channelsFile.close()
return (rawdata[3], rawdata[1])
    
channelsFile.close()
return ("0", "Not Found")

    except Exception as inst:
sys.exit("Error in findSkyChannel: %s" % inst)

# Change channel on SkyHD Box via IP given HEX Channel ID
#
def changeSkyChannel(channelId):
    
    XML="""<?xml version="1.0" encoding="utf-8"?>
<s:Envelope s:encodingStyle="http://schemas.xmlsoap.org/soap/encoding/" xmlns:s="http://schemas.xmlsoap.org/soap/envelope/">
<s:Body>
<u:SetAVTransportURI xmlns:u="urn:schemas-nds-com:service:SkyPlay:2">
<InstanceID>0</InstanceID>
<CurrentURI>xsi://%s</CurrentURI>
<CurrentURIMetaData>NOT_IMPLEMENTED</CurrentURIMetaData>
</u:SetAVTransportURI>
</s:Body>
</s:Envelope>""" % channelId

    headers = { "Content-Length": "%d" % len(XML), "SOAPACTION": "\"urn:schemas-nds-com:service:SkyPlay:2#SetAVTransportURI\"", "Content-Type": "text/xml; char-set=utf-8"  }

    try:
conn = httplib.HTTPConnection("%s:49153" % skyAddress)
conn.request("POST",  "/SkyPlay2", "",  headers)
conn.send(XML)
response=conn.getresponse()
data = response.read()
conn.close()

#### Debug Purposes
#os.path.exists(SkyTempFile) and os.remove(SkyTempFile)
#print data
        #os.chdir 'c:\temp'
        #f = open("skytempfile.txt",'w')
#f.write(data)
#f.close()
####
    except Exception as inst:
sys.exit("Error changing channel: %s" % inst)
pass

# Get Current Channel from skyHD Box
#
def getSkyChannel():
    XML="""<?xml version="1.0" encoding="utf-8"?>
<s:Envelope s:encodingStyle="http://schemas.xmlsoap.org/soap/encoding/" xmlns:s="http://schemas.xmlsoap.org/soap/envelope/">
<s:Body>
<u:GetMediaInfo xmlns:u="urn:schemas-nds-com:service:SkyPlay:2">
<InstanceID>0</InstanceID>
</u:GetMediaInfo>
</s:Body>
</s:Envelope>"""

    headers=  { "Content-Length": "%d" % len(XML), "SOAPACTION": "\"urn:schemas-nds-com:service:SkyPlay:2#GetMediaInfo\"", "Content-Type": "text/xml; char-set=utf-8"  }

    try:
conn = httplib.HTTPConnection("%s:49153" % skyAddress)
conn.request("POST",  "/SkyPlay2", "",  headers)
conn.send(XML)
response = conn.getresponse().read()

dom = parseString(response)
return (dom.getElementsByTagName('CurrentURI')[0].firstChild.data.split('//')[1])

    except Exception as inst:
sys.exit("Error getting current channel from %s: %s" % (skyAddress, inst))

# Do a command to pause the playback
#
def PauseSkyBox():
    XML="""<?xml version="1.0" encoding="utf-8"?>
<s:Envelope s:encodingStyle="http://schemas.xmlsoap.org/soap/encoding/" xmlns:s="http://schemas.xmlsoap.org/soap/envelope/">
<s:Body>
<u:Pause xmlns:u="urn:schemas-nds-com:service:SkyPlay:2">
<InstanceID>0</InstanceID>
</u:Pause>
</s:Body>
</s:Envelope>"""

    headers=  { "Content-Length": "%d" % len(XML), "SOAPACTION": "\"urn:schemas-nds-com:service:SkyPlay:2#Pause\"", "Content-Type": "text/xml; char-set=utf-8"  }

    try:
conn = httplib.HTTPConnection("%s:49153" % skyAddress)
conn.request("POST",  "/SkyPlay2", "",  headers)
conn.send(XML)
response = conn.getresponse().read()
        print response
        conn.close()

dom = parseString(response)
#Can't get this dom stuff to work fpr pause.  Don't think it's required though for doing a pause!!!
        #print dom
        #return (dom.getElementsByTagName('CurrentURI')[0].firstChild.data.split('//')[1])

    except Exception as inst:
sys.exit("Error doing a Pause command from %s: %s" % (skyAddress, inst))

# Do a command to stop the playback
#
def StopSkyBox():
    XML="""<?xml version="1.0" encoding="utf-8"?>
<s:Envelope s:encodingStyle="http://schemas.xmlsoap.org/soap/encoding/" xmlns:s="http://schemas.xmlsoap.org/soap/envelope/">
<s:Body>
<u:Stop xmlns:u="urn:schemas-nds-com:service:SkyPlay:2">
<InstanceID>0</InstanceID>
</u:Stop>
</s:Body>
</s:Envelope>"""

    headers=  { "Content-Length": "%d" % len(XML), "SOAPACTION": "\"urn:schemas-nds-com:service:SkyPlay:2#Stop\"", "Content-Type": "text/xml; char-set=utf-8"  }

    try:
conn = httplib.HTTPConnection("%s:49153" % skyAddress)
conn.request("POST",  "/SkyPlay2", "",  headers)
conn.send(XML)
response = conn.getresponse().read()
        print response
        conn.close()

dom = parseString(response)
#Can't get this dom stuff to work fpr pause.  Don't think it's required though for doing a pause!!!
        #print dom
        #return (dom.getElementsByTagName('CurrentURI')[0].firstChild.data.split('//')[1])

    except Exception as inst:
sys.exit("Error doing a Stop command from %s: %s" % (skyAddress, inst))


# Do a command to play, fast forward or rewind
#
def PlaySkyBox(PlaySpeed):
    XML="""<?xml version="1.0" encoding="utf-8"?>
<s:Envelope s:encodingStyle="http://schemas.xmlsoap.org/soap/encoding/" xmlns:s="http://schemas.xmlsoap.org/soap/envelope/">
<s:Body>
<u:Play xmlns:u="urn:schemas-nds-com:service:SkyPlay:2">
<InstanceID>0</InstanceID>
<Speed>%s</Speed>
</u:Play>
</s:Body>
</s:Envelope>""" % PlaySpeed

    headers=  { "Content-Length": "%d" % len(XML), "SOAPACTION": "\"urn:schemas-nds-com:service:SkyPlay:2#Play\"", "Content-Type": "text/xml; char-set=utf-8"  }

    try:
conn = httplib.HTTPConnection("%s:49153" % skyAddress)
conn.request("POST",  "/SkyPlay2", "",  headers)
conn.send(XML)
response = conn.getresponse().read()
        print response
#dom = parseString(response)
#return (dom.getElementsByTagName('CurrentURI')[0].firstChild.data.split('//')[1])

    except Exception as inst:
sys.exit("Error doing a Play command from %s: %s" % (skyAddress, inst))

###The main body of code

#Set up out droid object
droid = android.Android()

#Print some funky stuff
print "###################################################"
print "# SL4A Sky remote                                 #"
print "###################################################"

#Change the directory to where the description file is stored.
chdir ('/mnt/sdcard')


#Boolean to control the loop
KeepLooping = True

while KeepLooping == True:
  
  #Get the speech
  speech = droid.recognizeSpeech("Talk Now",None,None)
  print "You said: " + speech[1]
  
  #Big If statement
  if speech[1] == "still":
    PauseSkyBox()
  elif speech[1] == "play":
    PlaySkyBox("1")
  elif speech[1] == "stop":
    StopSkyBox()
  elif speech[1] == "2":     #Next commands do fast forward
    PlaySkyBox("2")        
  elif speech[1] == "6":
    PlaySkyBox("6")
  elif speech[1] == "12":
    PlaySkyBox("12")
  elif speech[1] == "30":
    PlaySkyBox("30")
  elif speech[1] == "minus 2":   #Next commands do re-wind
    PlaySkyBox("-2")
  elif speech[1] == "minus 6":
    PlaySkyBox("-6")
  elif speech[1] == "minus 12":
    PlaySkyBox("-12")
  elif speech[1] == "minus 30":
    PlaySkyBox("-30")
  #Now test to see if it's a channel number.  So three characters and a number
  elif len(speech[1]) == 3 and speech[1].isdigit:  
    #Get the channel details (in hex) from the description file
    channelId, channelName = findSkyChannel(str(speech[1]))
    #See if we had nothing returned
    if channelId == "0":
print "Unable to find HEX channel No"
    elif channelId == getSkyChannel():
print "Sky+HD is already tuned to %s (%s - %s).  No Need to Change" % (channelName, speech[1], channelId)
    else:   #Actually change the channel
      changeSkyChannel(channelId)
      print "Sky+HD Channel Changed to %s (%s - %s)" % (channelName, speech[1], channelId)
  elif speech[1] == "exit":
    KeepLooping = False
  else:
    print "Command not known!"  

Message from Emily, eldest daughter of the Geek Dad:

hi do you like this boring blog?