The answer was to do more with Scratch and we tinkered around with it and (my six year old in particular - she calls Scratch "Kitty-Cat") enjoyed this. We got the sprite to move around, react to keyboard presses and say stuff. Interesting to them but not super-exciting.
I decided we'd need to do some stuff with the GPIO to make it more interesting. This brilliant blog posting from SimpleSi explains how to do it. Full marks to him for doing this, it's excellent.
My first try was to build a Lego disco; it's shown on the picture below. On the picture you can see:
-The disco lights (bottom middle)
-The motors for the glitter balls
-The funky dance floor
...a view of the wiring and soldering, (so it's simply some jumper wires from the GPIO onto a bread-board, through some resistors and then to the LEDs:
Using Scratch GPIO control we could:
-Set up different light sequences.
-Turn the glitter ball motors on and off.
-Compose some music.
Here's an example of a light sequence and music, (not sure how to export Scratch code other than this!!):
...and two light sequences plus a method to piece multiple sequences together. The "when 3 key pressed" block is almost like a main procedure that calls two sub-routines. I like it!
The kids liked this but didn't find it super-exciting. There's only so many ways you piece together light sequences and making the music is a little laborious. For some reason, making the LEDs flash left to right then right to left like KITT / a Cylon didn't excite them!
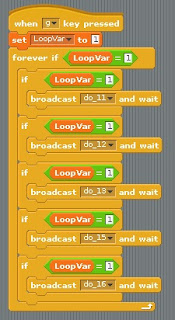
So the next plan was to create a game where the LEDs flashed in a sequence and you win by pressing the space bar when the central LED is lit. Here's the code, segment by segment. First, pressing G gets you in to the loop shown below:
So this sets a LoopVar with the value 1 then goes in to a loop, sending out a set of broadcast messages and testing LoopVar to see if the loop and the broadcast messages should continue.
The code segments that receive the broadcast messages are shown below:
So the code receives the broadcasts, sets a variable that can be checked to see if the LED is lit, lights the LED, pauses then turns the LED off.
The final code segment handles detecting when the space bar is pressed:
So when the space bar is pressed:
-LoopVar is set to 0 to come out of the "G" loop, (the "if LoopVar = 1" checks in the "G" loop means we don't light the LEDs for the remainder of the loop)
-We check which LED is lit.
-If the centre LED is lit (GPIO output 13) then you get a you've "won message", the LED flashes and a happy sound is played.
-If other LEDs are lit then you get a "you've lost" message and the Kitty Cat meows.
Subsequent modifications we made:
-Allow the time the light is on to be modified by changing a single variable, (rather than modifying 5 code blocks).
-Allow the time the light is lit to be gradually decreased, making the game harder.
-Added a "Points" variables that increases as the lights flash faster, (i.e. more points if you win when the lights are flashing fast).
My eldest said it was "Epic and fun at the same time" and my youngest said it was "Awesome". That will do for me!
(They subsequently said "can we play Minecraft" so there's still some work to do...)


Great to see it in use - love your project
ReplyDeleteFantastic collection very nice!
ReplyDeleteThank you for posting this game!!
ReplyDeleteExcellent Post.
ReplyDeleteKeep it up.
Best Scratch Games
Thanks a lot.
Fantastic collection!
ReplyDeleteSet up disco lights with flashing lights and use the led lights for stage to decorate the stage. However you have to keep the surrounding area dark enough to make things exciting. Thats how dj lighting australia is done.
ReplyDeleteNow you can use handy disco light in your smartphone with latest functionality. This best flashlight and strobe light app interface are simple, smooth and easy for use.
ReplyDelete